The End-All Guide to Camber Bolts and UCAs

Camber bolts and UCAs are related in that both items (when used separately or as a complete system) allow you to correct the alignment changes that occur up front when lifting your truck 2” and beyond. Camber bolts will give you a little bit of adjustment – for some this might be all you need. But if you find that after lifting you need more adjustment than what camber bolts can provide, that’s where UCAs come into play.
I. Application Notes For This Guide
The following guide applies to:
- 2nd-Gen D40 Nissan Frontiers.
- Model years 2005-2019.
- Both 4×4 and 4X2, Any Body Style.
This does NOT apply to:
- Those with body lifts only.
- Those with drop bracket-type setups.
- Those with Titan swaps and/or aftermarket LCAs.
- 1st Gen pre-2005 Frontiers (Sorry, can’t help you.)
II. What Happens Right After A Lift is Installed?
Before we get to camber bolts and UCAs, left s discuss what actually happens to your truck after you just install a lift. Once the wheels are back on the ground, you may find some/all of the following new things will happen with your truck:
- You’ll most likely have positive camber in the front, where the top part of your wheel/tire is farther outward than the bottom part;
- You might hear loud metal-to-metal clunking noises coming from the front suspension area, especially on rougher terrain (most likely CBC, or Coil Bucket Contact);
- You might hear rubbing or scraping noises when turning, where your tires are making contact with the fender and/or fender liner;
- If you just leave everything as is, you’ll eventually get uneven tire wear
Some people assume that all of these issues can be fixed by getting a standard alignment at the tire shop. This is true for toe angle, but your camber and caster is a different story. Once you lift your Frontier higher than what was intended, you alter geometry and suspension angles and your stock parts might not have enough room to adjust back to factory specifications.
This is why camber bolts and UCAs are part of the deal when lifting a Frontier – you will still need to get an alignment after doing a suspension lift (we’ll get to this later), but having camber bolts and/or UCAs first can help get the alignment back to factory specifications.
III. About Camber Bolts
A camber bolt is an eccentric bolt that is used as an aid to correct your front suspension’s camber and caster angles. For 2nd-gen Frontiers, this is done by replacing the Lower Control Arm (“LCA”) inner mounting bolts with eccentric camber bolts. The camber bolts allow the LCA to move outward and inward slightly to help correct wheel camber and wheel caster angle. Both adjustments are needed to keep your tires from rubbing fenders/fender liners when you lift your truck, upgrade tire size, change to wheels with a lower offset, or any combination of the above. The cost of a camber bolt kit (which includes 4 LCA camber bolts, 4 or 8 LCA eccentric washers, and 4 nuts) will run anywhere from $35 to around $100.
**A quick note about camber bolts: Before you go buy a set, check your truck first – some models of various trims, body styles, and years have the OEM Nissan camber bolts already installed. If your truck does not have them, keep reading. If your truck does have them, great – keep reading anyways and learn stuff.
IV. Camber Bolt Choices
There are basically two types of camber bolts you’ll be able to get for your truck:
Option 1: Aftermarket Camber Bolts

On the budget end of the scale, the aftermarket D-shape type bolts are popular due to generally being sold at a lower price (35$ to $80 a set depending on brand). These use bolts with part of the shanks “sliced off” to where the bolt cross-section is actually a D-shape. Their downside is that a lot of these kits do not have tight tolerances; some cheaper versions have washers that have play when installed on the D-shaped bolts (meaning you can still rotate them back and forth on the bolt a couple degrees). Since alignment is a matter of degrees to begin with, if not installed properly your alignment may be prone to change over time. Also, some members are having noise issues with some of these cheaper aftermarket types.
However, they can still do the job. Many people run this type as the D-shape camber bolts are the most inexpensive way to get LCA camber bolts, and are available from multiple aftermarket Nissan sources such as PRG, Nisstec, and 4×4 Parts. You can also find even cheaper versions on Amazon and eBay.
Option 2: Genuine Nissan Factory Camber Bolts
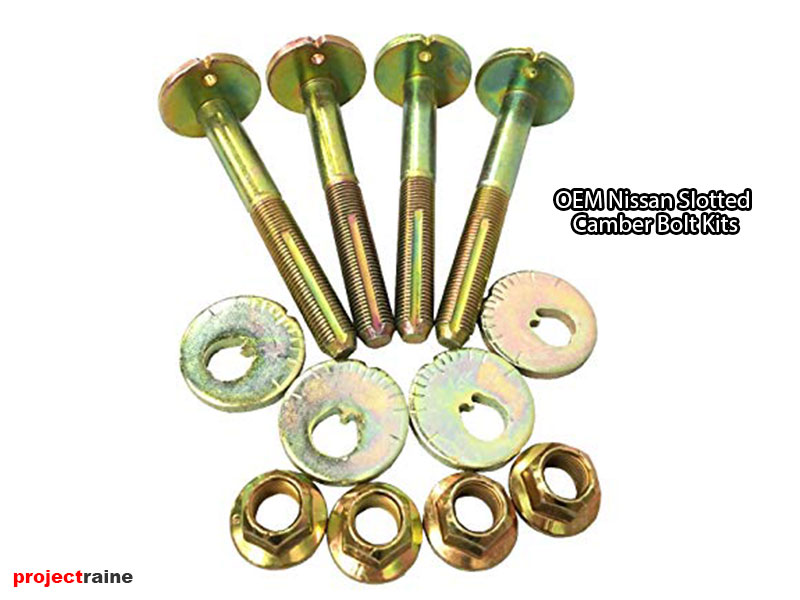
At the upper end of the scale you have genuine OEM Nissan camber bolts (around $80-120). The difference (besides being OEM) is that the Nissan bolts use a slotted bolt, not a D-shaped bolt. The OEM Nissan camber washers in turn have a pointed key that fits more accurately into the slot on the bolt. The tolerances are tighter, and because the OEM Nissan bolt is slotted, not as much material is removed from the bolt (compared to the D-shaped type) so they will be slightly stronger as well. I always recommend members go with the OEM camber bolts as they are the better design. Generally, these are sold in individual pieces with individual part numbers, as listed below (official Nissan part name/part#). You will need 4 of each for a complete kit, and you should be able to order these through any Nissan dealership or any official Nissan parts distributor/reseller:
- “Front Suspension Eccentric Disc” (LCA washer), Nissan part #54559-1Z600
- “Front Transverse Link Pin” (LCA camber bolt), Nissan part #54580-7S000
- “Lower Control Arm Nut” (LCA locknut), Nissan part #08918-6441A
**I have seen another part number floating around online lately, “999AK-D40FT” which includes all of the above, 4 pieces each. It looks like a factory Nissan part number, so you might want to try asking for this part number first at your dealership to get all the parts you need in one shot.
V. About Upper Control Arms
The upper control arm, or “UCA”, is the upper suspension component that connects the top of the front spindle to the chassis. The more premium UCAs feature threaded heim joints or adjustable spindle mounts that can be configured to also correct camber/caster values (like camber bolts do, but with more range) after you do a suspension lift. The cost of aftermarket upper control arms starts at around $400 up to around $750 for a pair (one left upper arm and one right upper arm).
Option 1: Budget eBay Clones or No-Name Branded UCAs
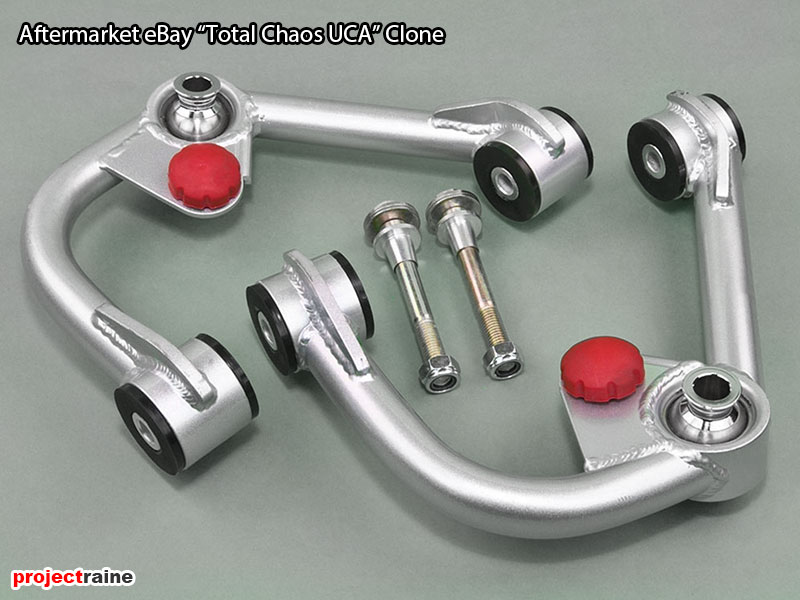
On the lower-priced end of the scale you have the cheaper eBay type fixed-length UCAs or non-recognizable brand name UCAs that are typically clones of more expensive UCAs in design (specifically, they’re most commonly clones of the Total Chaos UCAappearance). These are hit-or-miss; there are some forum members running these lower cost UCAs with no issues, there are some forum members that had to modify them with higher-quality uniballs and/or bushings (thus spending more money to “fix” something that was inferior to begin with), and there are some members who ended up returning them because of fitment or construction issues. Personally, I’ve never used the clones – and for me this is one area of a vehicle that I do not like to skimp on. Your results may vary if you go this route, but I’m sure there’s a lot of forum members who do use these UCAs that can give you their feedback on them and/or how to make them work.
Option 2: Premium Aftermarket Upper Control Arms
At the “enthusiast” end we have the premium adjustable UCAs from various recognized aftermarket brands. I used the word “premium” because expect to pay a much higher price for these options, but they are well worth the extra cost due to the features, construction, materials, and design involved… not to mention after-purchase tech support and warranties included with a brand name UCA purchase.
**A note about aftermarket UCA Installation: Depending on your truck year, some Frontiers have the OEM Nissan upper-rear control arm bolt installed facing forward. Because of this, to remove the stock UCA you have to either cut this upper-rear bolt, or disconnect the steering shaft coupler to gain access for removing the bolt. Most people would prefer not to mess with the steering coupler, so they cut the original upper-rear bolt to remove it. Fortunately, some of the premium UCA brands include a replacement UCA bolt with their UCAs – such as SPC and PRG. However, if you buy aftermarket UCAs that do not include an extra UCA bolt/nut and later find that you need it, expect to pay about $8 for a replacement UCA bolt and nut from the dealership. The Nissan OEM part numbers are:
- Upper Control Arm Bolt, OEM Nissan part #080B4-4801A
- Upper Control Arm Nut, OEM Nissan part #08918-6441A
VI. Upper Control Arm Choices
Okay – let’s get to the actual UCAs. Of the available UCA (Upper Control Arm) options for our D40 Frontiers, here’s my thoughts on each to help you choose what’s best for you:
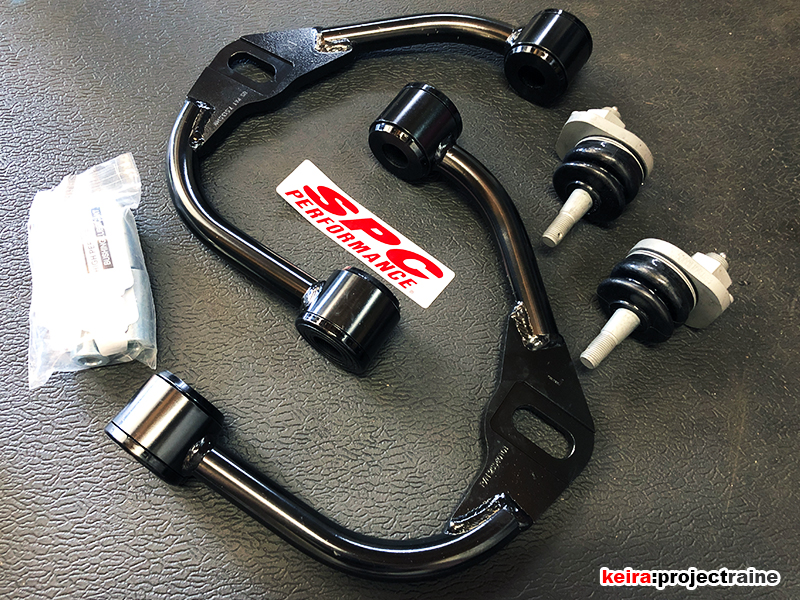
#1. SPC Performance UCAs ($510)
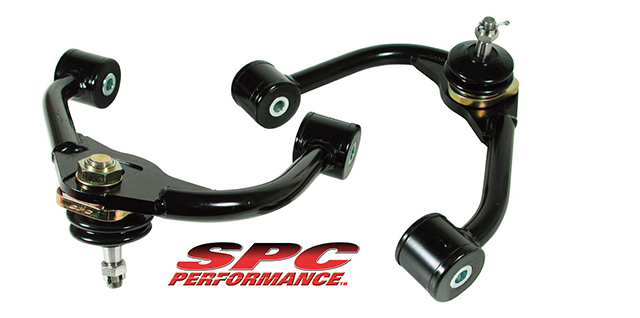
I recently switched to the SPC Performance UCAs and discovered just how good of an overall package these UCAs are. SPCs have an outboard adjustable ball joint for both camber and caster, which is super useful for getting that alignment dialed in. The ball joints have a protective boot to keep crap out. Yes, you probably have to do the coil bucket mod, but it’s worth it in my book. Also, the ball joints are easily greasable by the end user for quick periodic maintenance. Every component is available to buy separately when it’s time to rebuild. Also, if you’re more of a daily driver that wants a quiet suspension these have urethane bushings on the inboard side (no harsh jolts or knocking noises). For the best choice all-around, these are it.
PROS: Easily adjustable, user serviceable; high quality build; rotating outer ball joint that allows you to adjust both camber and caster up to +/-2-degrees camber and 0-4-degrees caster; inboard bushings absorb road noise and generally give a quieter ride; caster and camber adjustable without removing the UCA
CONS: Some coil bucket trimming may be necessary to get that perfect alignment (no coil bucket bump stops included)
#2. Total Chaos Fabrication UCAs ($745)
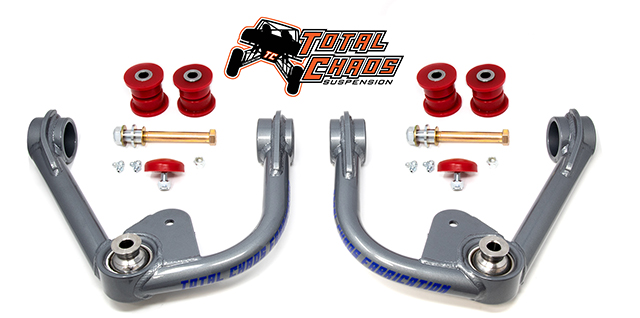
I’ll be right up front – Total Chaos Fabrication UCAs are super strong, super tough, super expensive. I used to have these on my truck; I liked how they had easily replaceable urethane bushings on the inboard side, they are a direct bolt-in (no pre-adjustment), and they look cool. A super bonus is that the Total Chaos customer service is great! They answer the phone all the time and stay on the phone with me through all my questions and concerns. I know a lot of people who have TC UCAs, and they all recommended them. I never heard a complaint from them either about the quality or any other issues. In fact the only complaint I hear about Total Chaos UCAs is always the price, and how the outer ball joints are exposed.
PROS: Super tough, proven quality; large-diameter outboard spherical uniballs for strength; inboard bushings absorb road noise and generally give a quieter ride; includes removable bump stops; zerk fittings included for greasing the inner bushings
CONS: Super expen$ive; outer spherical uniballs transmit more of the road noise; fixed inboard bushings mean no camber/caster adjustment
#3. Calmini Performance UCAs ($590)

The Calmini UCAs seem like a good design, they have inboard heim joints for added adjustability, responsive feeling, and strength. However anything with heim joints means that the daily ride does suffer. Every single noise from the road gets transmitted to the steering wheel and/or cabin. If they aren’t properly maintained you can quickly develop squeaks and creaks. Also, you have to completely remove the UCA from the vehicle to make any heim joint adjustments. On the other hand, the outer ball joints on the Calminis are protected with rubber boots to keep the elements out. Finally, if you like blue, well… here you go.
PROS: OEM-style ball joint; inboard heim joints give the largest range of adjustment for camber and caster; includes removable bump stops
CONS: Must be removed from the vehicle completely in order to make any camber/caster adjustments; inboard heim joints transmit much more road noise and driving surface imperfections, so you will feel (and hear) a lot more of the road
#4. PRG Products UCAs ($570)
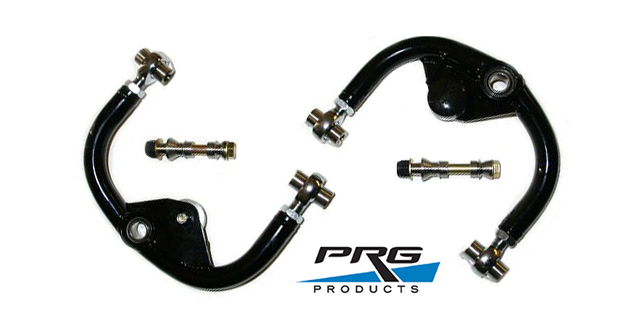
I’m aware that a lot of people on the Frontier forums use the PRG UCAs (some fanboy them LOL) but there seemed to be a regular amount of threads complaining about noise and squeak. The inboard heim joints allow for adjustment, but like the Calmini’s making those adjustments requires removing the whole UCA from the vehicle first. PRG does offer all the components separately for when it’s rebuild time, but good luck contacting them. For every one person who says “hey Greg at PRG is awesome!” there are about 10 people who can’t get a hold of PRG through email, phone calls, carrier pigeons, you name it. Good customer service is actually important, you know.
PROS: Large-diameter outboard spherical uniballs for strength; inboard heim joints give the largest range of adjustment for camber and caster; includes removable bump stops; durability vetted by many Frontier enthusiasts
CONS: Must be removed from the vehicle completely in order to make any camber/caster adjustments; outer spherical uniballs transmit more of the road noise; inboard heim joints transmit much more road noise and driving surface imperfections, so you will feel (and hear) a lot more of the road; PITA to talk to someone at PRG
#5. eBay “Aftermarket” / eBay TC Clone UCAs ($200ish-up)

Personally I wouln’t go here – not for a vital suspension component. I work at a place that deals with overseas manufacturing, and we actually know one of the factories that produce some of the aftermarket UCAs you can find on eBay. Let’s just say that not all metal is good metal; there’s a reason why the eBay UCAs are cheaper than the rest. I’d rather spend more on something that I’m confident will be quality made and reliable. However some people have used the Total Chaos copy UCAs with no problems… after replacing the ball joint. And the bushings.
PROS: Cheap prices; some look like real Total Chaos UCAs; inboard bushings absorb road noise and generally give a quieter ride; includes removable bump stops
CONS: Unknown materials and craftsmanship; zero warranty (you’re on your own pal); outer uniball joints known to be a weak point; fixed inboard bushings mean no camber/caster adjustment
VII. So What Do I need To Correct My Alignment After a Lift?
When it comes to the subject of camber bolts and UCAs, the magic number to reference seems to be TWO – as in 2” of suspension lift. That said – with any lift under 2 inches you should be fine with just camber bolts if your truck already has them. If your truck doesn’t, do yourself (and your tires) a favor and buy camber bolts when you install your lift. Even if you’re not lifting that high, you’re still altering the suspension of your truck and without camber bolts, you won’t have the ability to correct your camber and caster.
Keep in mind that the closer you get to the magic 2-inch mark, the higher the chances are that you’ll need to adjust your caster/camber. But even if you’re just doing a 1/2″ lift, I still strongly recommend installing camber bolts so that some alignment can be done; without camber bolts the only thing you can get adjusted is front toe. As far as UCAs go, for a mild lift below 2-inches, you should be good to go without UCAs; at minimum all you need to do after installing a mild lift is to get a proper alignment done to correct camber/caster/toe (assuming you installed camber bolts, of course).
However, if you’ve crossed the 2″ line, then swapping to aftermarket UCAs is not only recommended but possibly mandatory for 2”-up lifts, mainly to give you some adjustments for caster and camber but to also help eliminate Coil Bucket Contact.
Coil bucket contact (CBC) is when the UCA makes contact with the coil bucket area (the part of the chassis where your front shocks are attached), resulting in unwanted suspension to chassis contact, as well as loud metal-to-metal clunking noises

Most aftermarket UCAs are designed to clear the coil bucket and have more downward movement, enhancing suspension travel. Also, having more than 2” of lift will drastically alter your stock suspension geometry. If left as-is, your truck’s suspension will not perform as intended, and your handling and braking will be negatively affected.
So It doesn’t matter if you’re doing a front lift using top hat spacers, coil spring spacers, lift springs, adjustable perch shocks, or full threaded coilovers – you will need to address this situation regardless.
VIII. Parts To Get Based on Budget
Whether you need camber bolts, UCAs, or both depends on how bad your alignment (specifically camber angle) is after doing a suspension lift and how much money you have to spend. What you should actually get after installing a lift can be narrowed down to where you fit within these 3 scenarios:
I am Broke, so I’m Just Getting Camber Bolts… For Now
PROS: Cheap, because if the camber bolts didn’t already come with your truck, they’re easy to buy and lowest cost.
CONS: Limited adjustment range; after alignment you may still have positive camber (but less than before); decreased cornering traction; possible uneven tire wear. But at least you can move caster enough for some tire clearance.
NOTES: Your stock UCAs will most likely hit the coil bucket at full extension, and if you changed to larger tires or lower-offset wheels you’ll definitely have to mod your fender liners/splash guards to keep from rubbing. Eventually you’ll have to address the coil bucket situation.
I Want to Be Cheap, I’m getting Camber Bolts + Maybe eBay UCAs
PROS: Not as expensive as premium UCAs; eliminates coil bucket contact; simple bolt-in set-and-forget installation; bushings retain some ride comfort; less $$ than adjustable UCAs
CONS: Camber and caster adjustment limited to camber bolt range; unknown UCA materials and reliability; no UCA camber/caster adjustment
NOTES: At minimum, with fixed-length UCAs you will eliminate Coil Bucket Contact, allowing you have your full range of suspension movement without metal banging other metal. However, fixed-length UCAs do not have any provisions for camber or caster adjustment and the final position of your front wheels will be determined by the UCAs length and how high your lift is.
I Want to Do it Right with OEM Camber Bolts + Premium UCAs
PROS: UCAs Stronger than OEM; eliminates coil bucket contact; allows you to adjust camber and caster back to factory specifications
CONS: Most expensive method; ride quality may suffer (heim/uniball style), require periodic maintenance, full front-end alignment required after install
NOTES: Honestly, if you’re going to do the job, why not get the right parts the first time? Yes – premium adjustable UCAs are the most expensive option, but also the best option with reason – not only are they built stronger with premium materials and designed to easily clear the coil buckets, but they also have provisions for camber and caster adjustment. The adjustments are done either by a multi-position outer ball joint mount OR by adjustable threaded heim joints on the inboard side. These adjustments allow you to correct your alignment and some let you dial in added clearance for tires by altering caster angle.
IX. The Standard Alignment
After installing your suspension lift, you’re almost there, but not quite done yet – you still need that proper alignment. If you’re under 2″ of lift, you can probably go to any regular alignment shop and get a standard alignment where the technicians will put your truck on a lift, attach the alignment sensors, adjust your camber bolts to within or as close to allowable tolerances, put the truck back down, and you’re good to go. This is the most inexpensive alignment you can get after a mild lift, and it’s manageable for most. But it’s not as good as a custom alignment that will work best with your new, lifted ride.
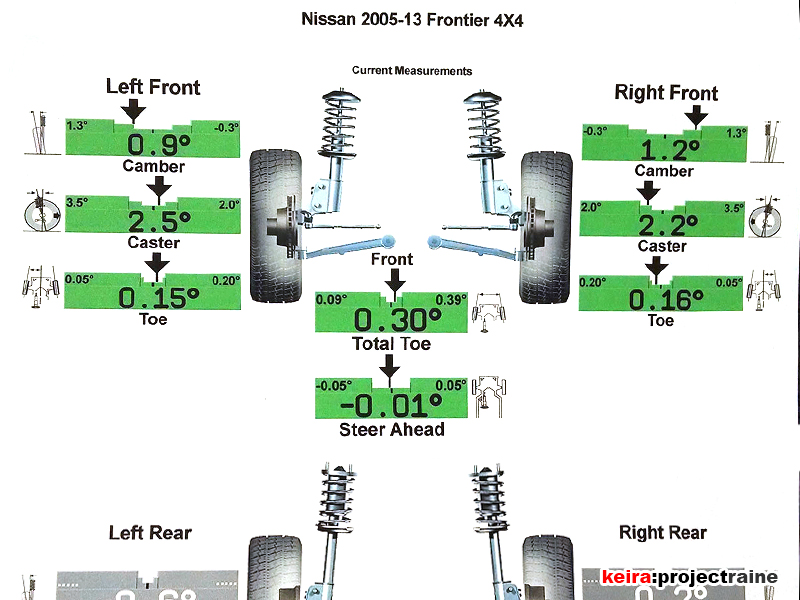
This is because anyone trained to give a vehicle a standard alignment will only make adjustments until the numbers fall within an acceptable window, which can mean the your alignment will be “within spec.” When a standard vehicle is aligned “within spec” that does not mean exact. For example, let’s the Nissan factory recommended alignment range for a 4WD Frontier are:
Camber = between -0.25 to +1.25 degrees (0.5 to +1 for 2WD)
Caster = between 1.75 to 3.25 degrees (2 to 3.5 for 2WD)
Toe-In Angle= between 0.12 to 0.18 degrees (same for 2WD)
Okay – with the above, the standard alignment person can put your front-left wheel at -0.25 degrees camber, 3.2 degrees caster, and 0.17 degrees of toe. Then they can put the front-right wheel at +1.2 degrees camber, 1.80 degrees caster, and 0.12 degrees toe-in. Well guess what? Because every setting falls within the factory recommended ranges, this is considered a correct alignment! It doesn’t matter id the left and right camber angles, left and right caster angles, and left and right toe angles are all different, this is how a standard alignment works.
X. The “Exact Spec”Alignment
If your lift is above 2″ and you throw in a set of adjustable UCAs, it just doesn’t make sense to spend all that money to get an alignment that is just “good enough”. You have the tools to get that perfect alignment, so why not go to a custom alignment shop that will adjust your suspension the way it’s supposed to?
I like to call this perfect alignment an Exact Spec Alignment. This is a custom alignment, where I request 4 specific things from the alignment person:
- Camber must be to my spec and IDENTICAL left/right
- Caster must be to my spec, and IDENTICAL left/right
- Toe must be to my spec, and IDENTICAL left/right
- Steering wheel must be DEAD CENTER with no crown compensation
If it isn’t obvious enough, the “Exact Spec” is a custom alignment where caster, camber, and toe are matching exactly from left to right… so if the left wheel has 1.00 degree of negative camber, the right wheel must also have exactly 1.00 degrees of negative camber. Likewise if the front right wheel has 2.55 degrees of caster, the front left is also adjusted to exactly 2.55 degrees of caster. Same with toe adjustment.
Also, I make sure the tech does not compensate for “road crown” – this is when regular alignments dial in some built-in pull to the left, to compensate for how most roads are sloping to the right. I prefer a dead center steering wheel with zero road crown compensation, so when I have my steering wheel pointed straight, I know that the wheels are pointed exactly straight.
Getting an exact spec alignment isn’t difficult, but you’ll have to shop around. Most chain-type alignment shops (Pep Boys, Firestone, Costco, etc.) will most likely stick to the standard alignment procedure for liability purposes. You’ll have to find smaller shops that have an alignment person that has worked with adjustable aftermarket suspension previously and is willing to do custom alignments. Call around, try to get in touch with the actual alignment tech themselves and just ask. Some places won’t advertise that they will do custom alignments (again, liability purposes) but yet they will if the customer specifically asks for it. Finally, be aware that you’ll probably have to pay more than the regular “standard alignment” price. This is normal, and it’s worth it – you’re paying someone to do a more accurate job.

XI. What Specs To Ask For
So you’ve found an alignment place who’ll do the job, you have an appointment lined up, and you’re about to head there to get your lifted truck aligned. But what should you ask for in terms of actual specs? Because every truck is different, there’s no exact numbers to suggest here. There are a lot of factors that can alter what specs to run: actual lift height, wheel size, wheel offset, tire size, if you have splash guards, etc. So with that in mind, here’s some guidelines to consider right before you get the alignment done:
- Have your truck READY. This means if you plan on changing wheels and/or tires, you’re going to want to do that first. If you plan on removing the splash guards, get rid of them now. If you’re swapping to a steel front bumper, get it bolted on immediately. If you’re thinking about dialing your coilovers up 1/2″, do that now. Do all your other exterior mods that might affect an alignment BEFORE you actually get it aligned, or you’ll just have to go back again after each mod.
- Fill up the gas tank to about 1/2-FULL. Your truck will sit in a position where it will be almost all the time.
- Make sure your TIRE PRESSURES are correct, and identical left/right.
- If anyone brings up the Nissan Factory Recommended alignment ranges, FORGET ABOUT THEM. These ranges are based on stock truck, stock ride height, no wheel, tire, or suspension mods. Remember, you are getting a custom alignment due to an aftermarket suspension setup, so chances are you will have values that exceed the factory recommended ranges.
- For CAMBER, for sure you’ll want anything below o-degrees; if your camber is above 0-degrees (you have positive camber) the tops of your tires will be out farther than the bottom, which is totally opposite of what you should have and exactly the reason why you bought some adjustable UCAs in the first place. Personally, I like to shoot for -1 degree of negative camber. Yes, this is outside of the Nissan factory recommended range, but this is a mild amount that will keep the outside of the tire from rolling under when cornering, but not too much that my front end traction exceeds my rear-end traction (not good in a RWD!)
- For CASTER there is no specific setting – because caster will depend on your vehicle’s tire-to-fender clearance. Most lifted frontiers will rub either the front fender liner or the rear fender edge – depending on which one, have the technician adjust your caster to move the wheel position away from where it’s rubbing. As an example, my setup required caster to be set at 2.5 degrees in order to clear the rear part of the fender… so I made sure to ask for 2.5-degrees on BOTH sides.
- For TOE, I ask for 0.15-degrees for both sides. This is dead center of the Nissan factory recommended range, and why I ask for this specific number.
- My alignment guy always does this so I don’t have to ask (but I thought I’d mention it because I don’t know who’s aligning your vehicle) but for the Frontier, it is best to torque all of the suspension arm bolts to spec with the vehicle sitting on its tires. This ensures there’s no “bushing twist” affecting your alignment settings. “Busing Twist” happens when you tighten the suspension bolts with the vehicle suspended on a lift, or when it’s on jack stands with the wheels/tires at full extension. When you put the vehicle back on the ground, these bushings (which you torqued to spec beforehand) will always have a “twist” in them (similar to spring pre-load) because the arms bolts were tightened while the suspension arms were not in their “normal” static position.
Just to reiterate – the above are guidelines. This is how I get my personal truck aligned, and in no way, space, or form are you required to do the exact same thing just because I typed it. If you want to copy my alignment, go for it. It’s your truck, you do what you want but be aware that you’re also responsible for it. I am not liable for anything if you use my guidelines and something goes wrong because you got a custom alignment based on what I recommended above.
XII. Conclusion
Hopefully this guide clears up all of your questions regarding camber bolts, UCAs, if you need them, and what to do once you have them. If there’s something I missed or if you have a question not addressed above, feel free to send me a message.
