How-To: Trailer Plug Relocation

I never liked how the OEM trailer plug was on a bracket protruding down from the receiver, it literally looked tacked on! So I decided to relocate it.
TOOLS/PARTS USED
- Power Drill
- 2-1/4” (57mm) Hole Saw Bit
- 1/4” Drill Bit for Metal
- Dremel Multi-Tool with Grinding Bit
- Socket Wrench, 10mm
- Combination wrench, 10mm
- Center Punch
- Masking Tape (I prefer ScotchBlue)
- Ruler
- Sharpie Pen
- Paint Marker
- Flathead Screwdriver (optional)
- Round-Edge Metal File (optional)
- Shop vac (optional)
The whole job takes less than 30 minutes. once I started cutting. This is an easy job, just make sure you have all the tools listed. I did not take photos of every single step, but the descriptions and the photos I do have should be easy to understand and follow.
STEP 1: From underneath the tailgate area, unplug the trailer plug harness from the trailer plug assembly. You can use the flat head screwdriver to help you here if it’s difficult to disconnect.
STEP 2: Using the 10mm socket and combination wrenches, unbolt the trailer plug from the bracket. Set the hardware aside for now.
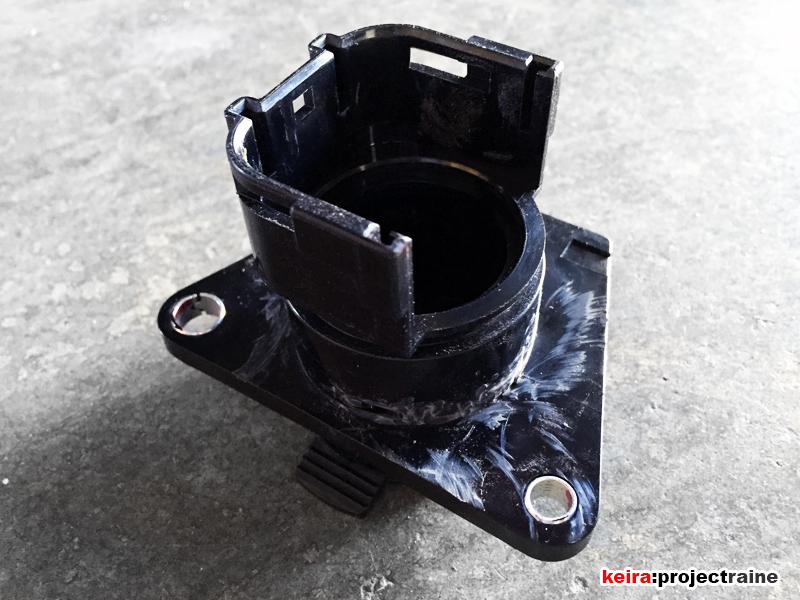
STEP 3: Let’s work on the plug first. Using a Dremel with a grinding bit, carefully trim away all the little tabs and steps that surround the round portion of the plug. This will make it easier to install into the bumper, since you won’t have to notch and trim the bumper hole.
STEP 4: Now on to the bumper. Using masking tape, mask off the area to the left of the license plate location from top edge to bottom edge. Use your ruler and Sharpie pen and make a dot that is centered top-to-bottom and left-to-right. For left-to-right, measure from the license plate frame up to where the bumper just starts to curve.
STEP 5: With your mark in place, take the center punch and punch a guide on the Sharpie mark. This is important as it will keep your hole saw bit from wandering when you start drilling/cutting.
STEP 6: Using a drill and the 2-1/4” (57mm) hole saw bit, SLOWLY begin cutting the hole. Take your time here, no need to rush the cut. When the drill bit is through the bumper and the hole cutting blade starts to make contact, make sure to hold the drill level with the bumper so that the hole cutting bit is flush with the bumper. Don’t push with force – let the hole saw do its thing.

STEP 7: Once the hole is cut, don’t remove the masking tape yet. Take the round-edge metal file and clean up the hole edges; if you don’t have a file, you could use the Dremel and grinding bit, but use a low speed and take your time.
STEP 8: With the hole cleaned up, insert the trailer plug into the hole, make sure it’s level, and mark the bolt holes with your Sharpie. Center punch the marks, and then drill two 1/4” holes.

STEP 9: If all is well up to here, you can now remove the masking tape from the bumper. Use a paint marker to seal the bare metal edges of the holes you made to help combat rust.

STEP 10: Slide the trailer plug into the hole. It should be easy since the 2-1/4″ hole saw gives some extra room to get the trailer plug through with no hassles. Use the 10mm bolts to attach the plug to the bumper.

STEP 11: Plug the harness back into the rear of the trailer plug, and the relocation mod is complete!

To get rid of the original bracket, I chopped off as much as I can with a sawzall, but then I had a rough edge along the back, and there was still the plate at the bottom that I couldn’t take off without a grinder. Of course I can’t leave it like this, so first I used the Dremel to clean up the sharp edge and remove some paint from the surrounding areas and the plate welds. Next I used some JB Weld Steelstik to blend in the edges of the plate and the cut edges into the shape of the receiver. Once that dried I used a Dremel, a file, and a sanding block to smooth out the shape before finishing it off with primer and matte black spray paint. Even if it’s a spot that most people might not even see, I still like doing a good job because I know I will see it.

And if you can’t see where the bracket used to be, here you go:
