Hood Prop.
I saw this posted in another thread and I ordered a set right away just like the other members – it’s a Hood Strut Kit/Hood Rod Eliminator from Off-Road Gorilla. Pretty self explanatory by the name: it lets you remove the hood prop rod and replace it with a pair of gas-charged struts. The whole kit is bolt-on, and literally took me 10 minutes to install. Also, although I didn’t take full step-by-step photos, I did manage to snap some pics.
Tools Needed
- 10mm socket
- 12mm socket
- Flathead screwdriver
I started with the right passenger side first, you’ll read why in a little bit.


ABOVE: The kit doesn’t come with any hardware, because you use existing bolts and nuts. Above, the lower bracket is held in position by one of the 10mm fender bolts. The left side lower bracket installs in the same fashion. INSTALL TIP: Start with the right side, loosen and remove the lower hood nut. Then with your left hand, pinch the hood and the hood bracket at the top edge and hold it together. While holding the hood and bracket together, loosen and remove the upper hood nut with your right hand.
At this point the hood will only be attached to the left hinge, but don’t worry – you don’t need that much effort to hold the hood and bracket together, and this will help keep it aligned. Now, using your right hand, put the ORG bracket on the bolts and hand tighten the nuts. Then finish up with your 12mm socket.
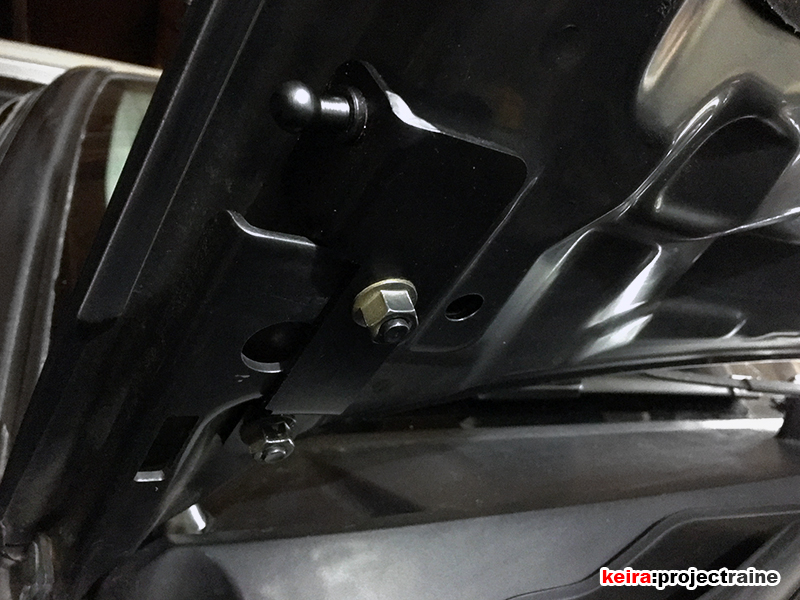
ABOVE: The upper brackets install using the existing 12mm nuts that hold the hood to the hinges.

ABOVE: Unlike what is shown in the instructions on their website, the struts have been updated to pop-on units. The ends have retaining clips, so you literally just pop them onto the ball end and you’re done.
Remember how I mentioned earlier to start with the right side first? That’s because it’s the easiest to do, and once you have the right side strut installed, it will already be strong enough to hold the hood up on its own while you work on the left. This is key because now you can remove the stock hood prop rod and prop rod retainer clip. I did not take photos of this, but to remove the prop rod just flip it forward then twist it upwards slowly until it just pops out of the fender. As for the prop rod retaining clip (which is obviously no longer needed), use a flathead screwdriver to gently pry it out of the inner fender without breaking it. You do have to remove this clip, as it sits where the left strut will be when the hood is closed.


ABOVE: Off-Road Gorilla claims that their kit will let the hood open up an additional 5 inches. I did not measure beforehand, but considering that there’s now a 3 inch gap between the stock hood prop rod and the rod hole, I think their claim is accurate.

ABOVE: One thing that worried me was if the hood would open up too much and end up hitting my Firestik Antenna Mod, since it’s a lot thicker in diameter compared to the stock antenna in the same location. However as you can see in the photo above, there’s still ample clearance.

Install was completed in about 10 minutes by myself. It’s a simple mod that does exactly what it’s supposed to do, at a pretty decent price ($65 shipped!). I would definitely recommend this kit for sure.