Such A Hard Case (Air Comp Project, Part 1)
Air Comp Project, Part 1: Viair Hard Case Mod
This isn’t exactly “Frontier specific” but it’s something meant specifically for my truck, so here it is.
Switching to the topic of airing down/up during off-road excursions, leave it to me to come up with a DIY project that could have been easily avoided if I had just decided to buy the $375 ARB CKMP12 Portable Air Compressor – you know, the cool looking one that sits inside a toolbox. However the more I looked into that unit, the more I was reading that a lot of owners weren’t exactly thrilled with its reliability (something not normally associated with the ARB brand). Personally I thought that the grey plastic toolbox had thin walls, and the plastic (!) latches felt flimsy for something priced that high (my cousin actually broke a latch, had to jump through hoops to get a replacement under warranty). So when it came down it, I decided to pass on paying $375+ tax just because it was branded “ARB”… and instead, I decided to make my own version of the hard case air compressor, DIY style.

To get started I needed an air compressor, of course. I already had a reliable Viair 300P for a few years now, but it did not have the auto on/off function that the ARB had (where it will only turn the air on when you need it, and automatically turn the air off when you don’t). I really liked my Viair compressor, so the first thing I started to do was look into DIYing my own pressure switch/auto on and off contraption for my 300P, until I discovered that Viair already had the 400P-Automatic! that was the first piece of the puzzle. The 400P-Automatic not only had the auto on/off function I was looking for, but it was also rated for larger tires (up to 35″, vs. maximum 33″ for the 300P) and more powerful (read: faster) than the 300P. I sold the 300P quick and ordered up a new 400P-Automatic:

Fresh out of the box, brand new Viair 400P-Automatic Air Compressor.
More fun facts: It turns out that the 400P-Automatic has a higher maximum output rating (150-psi vs. ARB’s 100-psi) and a claimed faster fill-up time than the ARB for similar sized tires. So far so good; once the 400P-Automatic arrived I took dimensional measurements and started the search for a good sized tool box with a reasonable price. My criteria was something around 18″ long (the ARB for comparison is 17.3″ long); something that had much thicker, stronger walls and floor (unlike the thin ARB tool box) with reliable, heavy duty metal latches (unlike the ARB’s plastic ones); something within a reasonable price (under $50) . My first stop was Harbor Freight, where I ordered a “Voyager” 20″ Stainless Steel tool box for $30 shipped:

Big Mistake! This thing looked good on the website but boy was I surprised when I saw it in person! The walls were stainless steel… thin stainless steel – as in “poke it with your pinky and it will flex” thin. The plastic parts were brittle and creaked when any pressure was applied to them. There was zero internal reinforcement, and there was no way I was going to even try to build my own hard case compressor with this thing. I immediately returned it, and a few days later I found this:

This is a Craftsman 18-in. tool box that features thick, heavy duty composite walls and top; two large, lockable rust-proof metal latches; and an IP54 rated water resistant seal around the opening to keep water and moisture out. It also had a pair of neat sliding drawers, but for this project I removed them.
The build was composed of a lot of spare items I had in the garage (hardware, wires, connectors, etc.) and I tried to order anything else, as little as possible, to keep the final cost down as low as possible. I did have to pickup some small specialized tidbits from McMaster-Carr, but aside from that I used what I had:

I buy a lot of hardware from McMaster-Carr, and good thing they’re local!
Starting with mounting: my plan was to remove the 400P-Automatic’s standard base so that I could mount it to the inside floor of the new tool box. After some brainstorming I settled on using M6 hardware, rubber isolators, and low-profile stainless steel flush nuts to serve as mounting points for the air compressor:

I trimmed the bolts down so that they sat below the bottom of the tool box, ensuring that the tool box could still sit flat.

Rubber isolators installed, these will keep vibration down and not make the tool box move around while in use.

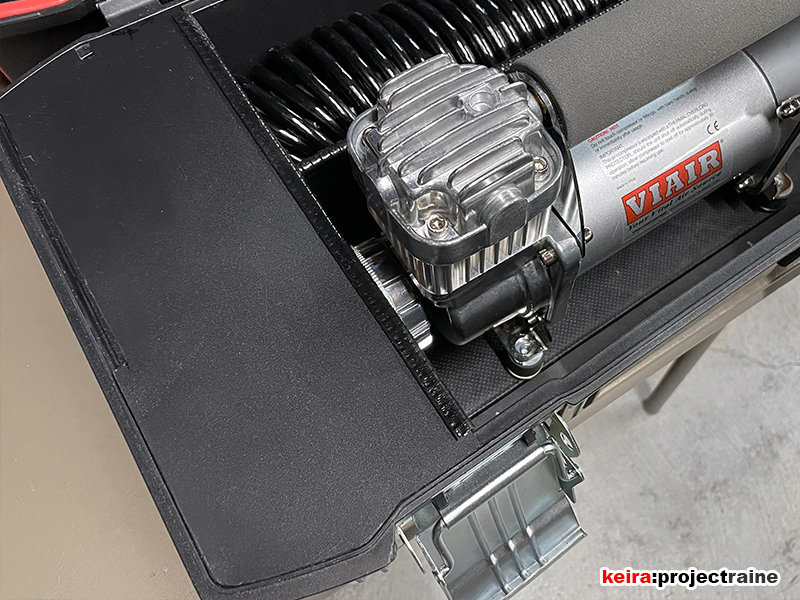
Next, I trimmed an unused plastic paper tray straight down the middle, trimmed it down to size, filed the edges, and mounted it as a divider for the tool box. This would allow me to store the air compressor hose on one side of the tool box without the hose touching the air compressor’s metal body (which will get hot under normal use). I used two of the rubber isolators as mounting screws for the divider, securely sandwiching it down to the floor of the tool box:


Next, I started working on the “control panel” for the left side. I wasn’t sure yet what things I was going to put on this panel, but I knew that I wanted something that looked better and was more functional than the little metal plate that the ARB had. The inner shape of the Craftsman tool box made it a little complicated; I used cardboard and a lot of trimming to match the inner shape of the tool box walls, transferred the shape to the other half of that same paper try I used earlier, and did a lot of Dremel work and hand filing afterward to create the panel:
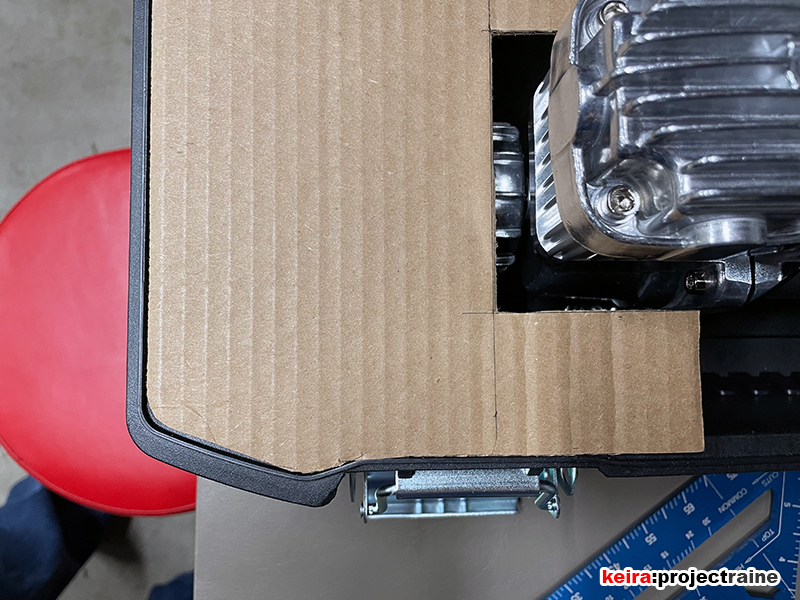

The Dremel is still faster than a hot knife… just wear eye protection and be careful of hot plastic bits flying everywhere.

I used some leftover 1/8″ rubber edge trim I found in the garage for the control panel and the center divider.
Now that I had a blank panel in place, I kept running through different layouts in my head of what I could install onto the panel. Everything from a quick connect cable socket, to some LED indicator lights, to separate switches for a possible fan cooler, and so forth… but since I couldn’t make up my mind, I decided for now to just install the quick connect cable socket (which I already bought) and do the rest later. After reinforcing the underside of the control panel with a pair of L-brackets (which bolt to the side walls of the tool box for a secure mount and solid support) I installed the quick connect socket, a temporary 12V/40A relay, and a quick-connect plug to lead to the actual air compressor:

likewise I also did some wiring modifications on the 400P-Automatic to get rid of the OE crimp connections, then while I was in there I also wired in its own quick connect:


Hardwired everything inside, and added in a 10-Gauge heavy duty SAE quick connector on the end.
With the wiring part done for now, I then took apart all the hardware, added a drop of liquid threadlock to each bolt, reassembled everything, and then finally – I reached the point where I could actually bolt down the air compressor into the tool box! The tight clearance meant it was slightly awkward to get the short bolts down into the lower bracket (I need a longer 4mm hex wrench) but with some patience I got the compressor attached to all four rubber isolators:

…and here it is. Not exactly the “final” version, but 100% fully functional:

A quick summary of the parts I used so far:
STUFF I HAD TO BUY
$221 Viair 400P Automatic Air Compressor
$25 Craftsman 18″ Heavy Duty Tool Box
$10 4-pcs. Anti-Vibration Mounts
$14 Misc. Hardware from McMaster-Carr
TOTAL $270
STUFF I ALREADY HAD
SAE Connectors
New, Unused Paper Tray
1/8″ Rubber Edge Trim
Some Wire and Solder
During this build there were more than a few things that I have kept in mind when I get around to revising it later:
- 10-gauge wire might be overkill, and it’s a pain to bend into tight angles.
- I’m going to have to monitor the wire temps when I use the air compressor in real world conditions to see if I can downsize it a little.
- For redundancy purposes I may incorporate either a replaceable fuse holder or a resettable circuit breaker into the control panel.
- Do I need a separate on/off switch on the panel?
- Should I install a voltmeter (for looks) or an ammeter (for data)?
- Maybe some LED lighting for night use?
So that’s it so far – part 1 is done, for now. The next part of this project will involve an add-on accessory that requires a lot of brass fittings… heh!
