Audio Upgrade Guide, Part 8: Time Travel… While Sitting Still

PART 8: Time Travel… While Standing Still
a.k.a. How to use Digital technology for great analog results.
In part 7 the topic was about active component systems – which were two or more speaker drivers independently filtered and individually amplified. Now take that idea and expand it to your entire audio system, because it’s basically the same thing! You have a separate speaker at each corner of the front dash, separate speakers in each front door, separate speakers in each rear door, and possibly also separate speakers under the seats (subwoofers). Each of these “corners” of the vehicle has separate filters and amplification, just like a 2-way component system.
In the Middle of it All
Generally, when listening to audio (whether it’s a home stereo system, a movie theater, or at a live concert) the most ideal position would be in the center, with the left and right sound sources (the speakers) equal in distance to your left and right ears. Looking at the speaker positions in the Frontier, at first thought, one might think that hey – no problem, because the speakers are all positioned in the same locations from left to right, so it should have perfect balance… until you realize that even if the speakers are mounted symmetrically from left to right, YOU are not sitting in the middle of the speaker locations:
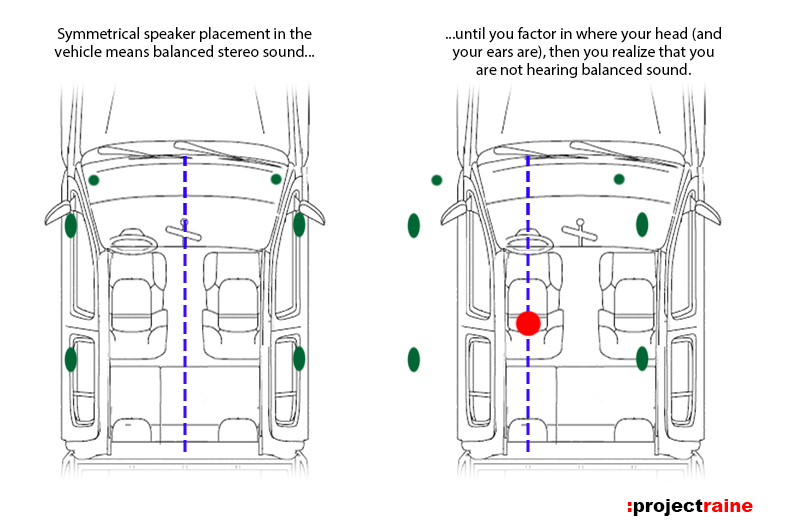
The green dots above represent the factory speaker locations in the Frontier. On the left diagram you can see that they are mounted symmetrical to the centerline of the vehicle, with the perfect centered position being along the blue dashed line intersecting the vehicle dead center. On the right diagram is where reality kicks in: if you move that blue dashed line to be centered between the driver’s two ears, you’ll see that to get the same balance relative to your seating position, the speaker placements aren’t ideal. Even if you moved the right-side speakers closer to your seating position (like shown in the upper-right diagram), to balance that out you would have to mount your left speakers approximately 2 feet or so outside the vehicle to your left! So, because the speakers in a vehicle are not symmetrical in position relative to where the listener (you) is seated, there is a natural imbalance in sound. It would be like going to a live concert and sitting in the far-left corner of the front row; sure you can still hear the music, but because your position is biased to the left, everyone sitting in the center seats right in front of the stage will always hear better overall sound than you will. The sound level isn’t different at all, because the musicians are playing the exact same music at the exact same levels to everyone in the audience; it is your position relative to the sound that changes how loud you hear it, from what direction you hear it, and how loud you hear it.
A Quick Experiment
Don’t believe it makes a difference? Try this quick experiment: sit in the driver seat of your Frontier, engine off but stereo on. Listen to some familiar music at a slightly louder than usual volume level. Sound “good” right? Now find the Balance control on your head unit (the Balance controls left/right output levels); with your hand on the balance control, close your eyes, and listen to the music some more as you turn the balance all the way to the LEFT. You will notice that it sounds about the same in your left ear, but you can no longer hear the right speakers (obviously because you just cut their output). Now keep your eyes closed and turn the balance all the way to the RIGHT. You will not only hear the music sweep from your left side to your right side, but the overall volume level will not sound the same anymore; it will sound a lot lower and you will feel a lot farther away from the sound source. What you just did was demonstrate how being closer to the left-side speakers not only makes them sound louder but closer as well. So how do we fix this?

Time Travelling
Enter the Digital Signal Processor (or DSP). Technically at its most basic form, a DSP can simply be the built-in crossover feature of your head unit – it’s digital, and it processes the signal before sending the sound to the speakers, right? But for now, we’re talking about the types of DSPs that have not just crossover settings, equalizers, and level control, but also a key feature: time alignment. The time alignment feature of a DSP gives you the ability to delay the sound signals going to specific speakers with the intention of delaying it just enough so that when that signal finally reaches the listener, ideally it will be synchronized exactly to the sound output of all the other speakers in the system.
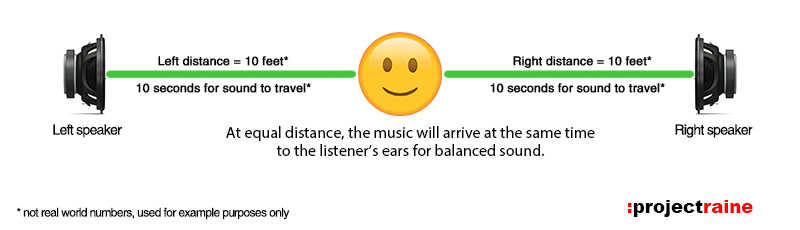
If that sounds a little confusing, no worries – I’ll simplify it with the use of some diagrams! For this example, let’s say that sound travels at 1 foot per 1 second (Sound actually travels at around 1,1100-feet per second, give or take a few feet depending on environment variables). So for our example, sound will take 10 seconds to hear from a speaker positioned 10 feet away from your ears, like shown below:
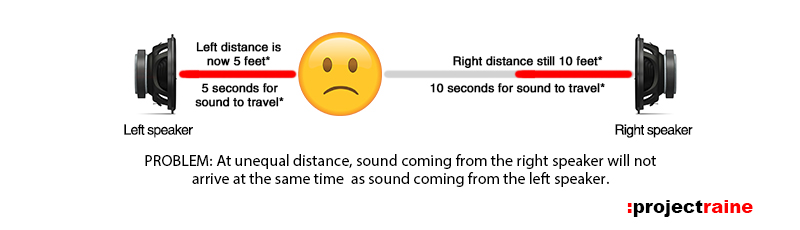
If we take the same setup and move the left speaker 5 feet (half the original distance) closer, you now have unbalanced sound; the sound from the left speaker will only take 5-seconds to arrive in the listener’s ears, but the sound from the right speaker will arrive 5-seconds later:
So how does time alignment work? The DSP will use time-alignment to electronically delay the left speaker output for 5 seconds before playing sound; that effectively gives the right speaker 5 seconds to catch up, and the end result is that the sound from both speakers will arrive at the listener’s ears at the same time regardless of physical speaker distance):

With the DSP doing its job, the listener will not notice the physical distance difference between their ears and the speakers. They will feel like they are listening from a center position, even if the driver’s seat is biased to the left and the left-side speakers are much closer than the right-side speakers.
And the above just touches on one of the many capabilities of DSPs! DSPs can do much more than just time alignment; depending on model (and cost, of course!) they can also serve as your primary crossover for each individual speaker in your system; they can adjust the actual output level of each individual speaker; they can multiply outputs for component type setups (take 1-channel input from your head unit and multiply it to go to 2 component speakers; they can serve as an almost infinitely adjustable parametric equalizer for each individual speaker; some DSPs can provide a “valet mode” so that the parking garage guy doesn’t blast your sound system for their own pleasure; some DSPs can show you real-time audio output with the assistance of an app or laptop; and some DSPs can also self-tune themselves to work the best in your specific vehicle. DSPs leverage the “digital” portion of the audio path to optimize your sound so that it can be fine-tuned to your environment and to your liking.
Duck Duck Goose
Maybe the above has sparked an interest in how a DSP can improve your truck audio, but before you go any further, look first at your current audio system to see if you can add a standalone DSP:
1. You have the OEM Head Unit directly connected to OEM speakers
If your audio system is in its untouched stock (non-Rockford Fosgate) configuration and you’re looking to improve your sound quality, you’re looking too far ahead. The sound quality of the stock Nissan Frontier head unit and speakers are very poor (Don’t think so? then go back to the Intro of the Audio Guide and start reading there) and a DSP won’t fix that. Instead, focus your initial upgrade on swapping out your OEM speakers and OEM head unit with higher-quality aftermarket items first. As that saying says, “You can’t polish a turd.” (Even if Mythbusters proved it was plausible, LOL)
2. You have the OEM Rockford Fosgate “Premium” System
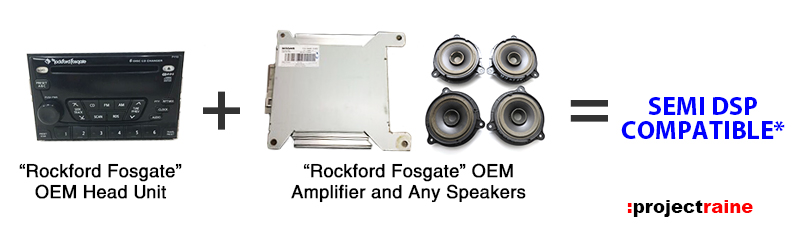
If your Frontier came with the OEM Rockford Fosgate “Premium” System then technically you have a separate head unit and amplifier. However, the RF system has two issues from the get-go:
A. Due to how the OEM Rockford Fosgate system connects to each other using proprietary Nissan connectors (and not standard car audio connections like RCA cables) It will take some work to wire a standalone DSP between the RF head unit and RF amplifier; and
B. The OEM Rockford Fosgate head unit applies some signal processing on its own before sending the signal out to the amplifier, and you can’t disable this so your add-on DSP will not be getting a full input signal (which it needs to work as intended).
That said, if you’re still willing to cut and splice to shoehorn a standalone DSP unit in between the OEM R.F. head unit and amp, it can be done… but I wouldn’t.
3. You installed an Aftermarket Head Unit
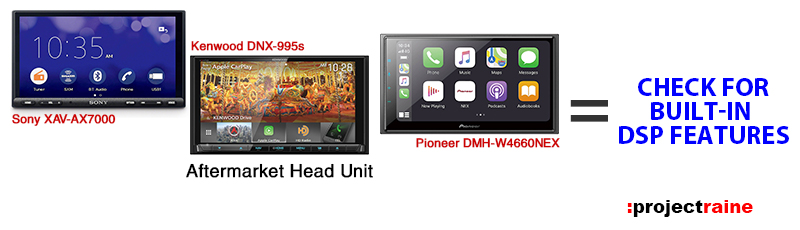
Regardless of what speakers you have, did you already upgrade your head unit to an aftermarket one? If so, check first to see if it has a DSP inside! Many of today’s aftermarket head units (especially mid-range and up) feature some sort of DSP functionality or time-alignment built-in to let you fine-tune your audio. You can find DSP functions built into head units from Kenwood, Pioneer, and Alpine; they might not be as fully featured as a standalone DSP unit, but hey – some features are better than none. If your aftermarket head unit has time alignment, that feature is worth tinkering with to get a feel for how a DSP can shape your audio quality.
4. You added an Aftermarket Amplifier using speaker-level (high) inputs
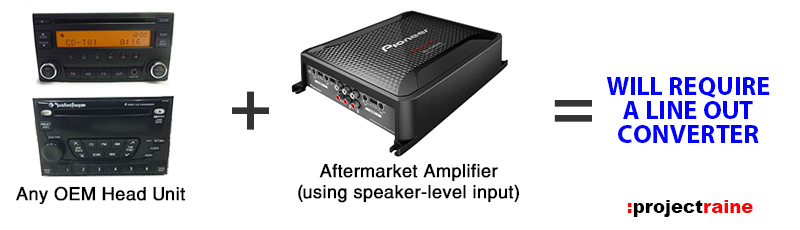
If you have an OEM head unit and aftermarket amplifier, take a look at how they are connected at the input side of the amplifier. If it looks like speaker wires are connected to the amplifier’s inputs, then you are using the amplifier’s built-in high-level input feature. This is only used when your head unit does not have RCA line-level outputs. In order to add a standalone DSP to this configuration, you will need to use a ”Line Output Converter” that takes the head unit’s high-level speaker outputs and converts them down to line-level (low) RCA output. But before you do that, first check if the amplifier itself has any sort of built-in DSP functionality! Lately, many aftermarket car audio amplifier brands have started offering amps with built-in DSP features, knowing that the amps will be used in less-than-ideal acoustical environments.
5. You added an Aftermarket Amplifier using line-level (low) RCA inputs

Did you add an amplifier and an aftermarket head unit? If neither your aftermarket head unit nor amplifier(s) have DSP functionality, then you’re looking at adding a separate, dedicated DSP unit into your audio system. That said, luckily this is the easiest audio configuration to integrate a standalone DSP because installation would be literally plug-and-play. Instead of having a set of RCA cables connecting from the head unit’s outputs to the amplifier’s inputs, you would connect the head unit to the standalone DSP’s inputs. Then, the DSP’s outputs will connect (also using RCA cables) to the amplifiers to send the processed audio signals out to your speakers.
Wait.. Do I Really Need a DSP?
Although DSPs for car audio have been around since the first commercially available one in the early 2000s, the majority of the general population that has listened to music inside a vehicle did not have a DSP, and it did not bother them at all. In fact, if you’re reading this now you probably have never listened to a car audio system that had a DSP, and up until now you didn’t even care, right? So then why even bother with a DSP? This brings us back to the question above, and I will make the answer very clear:
Do you need a DSP? I will tell you, with 100% confidence that the answer is definitely no – you don’t.
There is a distinct ‘line in the sand’ between the majority of folks who may have done some basic upgrades (like swapping in better speakers, adding a sub, or changing to an aftermarket head unit), feel like they are “not an audiophile” and thus don’t need to go any further with their upgrades, vs. the select folks who make the decision not just to upgrade their car audio (er, truck audio) but to also try to get the best out of their upgrades. Some might be driven by wanting to optimize their equipment to their vehicle environment, some may be trying to get the same quality of sound they get from their home stereo to their truck, some may like gadgets and tinkering, and some may just be some hybrid of all 3 (like me!). So with that said, if you have decided that you want to add DSP functionality to your audio system, understand the following:
- It won’t do miracles.
If your new door speaker has little bass, or you can’t hear certain instruments in a song like you can on other vehicles, a DSP won’t fix that. A DSP isn’t a magic machine, but an advanced fine-tuning tool that one should only use once their audio system has been set up and adjusted as good as possible without a DSP.
- It will add complexity to your audio system.
When you add a standalone DSP, you also add a bunch of new settings and controls to your audio that you did not have before. These include input levels, crossover points, parametric equalizers, input mixing, time alignment, filter slopes, multiple profiles, and more. A DSP is far more complex than your standard “bass/mid/treble” controls, but in return, you get granular control of pretty much every tuning aspect of your audio system.
- There is a learning curve.
Regardless of which DSP you choose, there will also be an associated software interface – usually computer-based, to be used with a laptop and generally a direct USB connection to the DSP unit itself. This software is your “control center” and gives you access to all of the DSP settings. Every manufacturer has its own tailored version of DSP software, and some are better than others. Some DSP software (like the MiniDSP 2×4) can be “newb-friendly” and easy to use, with limited but easy-to-adjust parameters. Other DSP software (like the Helix Advanced DSP Interface) can be very complex, with fine granular control and expert-level available features.

- You will spend more money.
A standalone DSP is capable of improving your current audio system, but it might also show you where your system is lacking. For example, if you currently have a component speaker system upfront that uses a passive crossover, the DSP cannot make adjustments to each individual speaker, since a passive component system shares the same output signal from the amplifier. In order to have complete control of your dash speaker and the door speaker independently, they will have to have separate audio channels from the DSP – and that means they will also need separate amplification.

Another thing that will cost more money: don’t forget that when you add a standalone DSP, you will have to run a new set of power/ground/remote cables to it, and you will need a new set of RCA cables to integrate it into your current system – and cables add to the total cost. And once you have the DSP installed? You may end up looking at getting a calibrated microphone to use with your software when you get into tuning with Real-Time Analysis. Finally, consider the cost of the DSP unit itself; The current configuration of your audio system may dictate how much you will have to spend on a particular DSP. For example, the OEM Frontier configuration can have as little as 4-channels (basic left/right, front/rear 4-channel system) and as many as 9 (if you run a component system in each door + a subwoofer). If you want complete control of a multi-channel system, you will have to get a DSP that can support as many channels as you have. So let’s say you installed a component set upfront (like most Frontier owners will do), that’s 4 speakers already. To take control of just your front speakers, ideally, you’ll want to have separate amplification for each speaker – and a DSP with a minimum of 4 channels of support to control each of those 4 speakers… and that will only take care of the front. Don’t forget that you’ll most likely also have another 2 speakers in the rear doors, and possibly a subwoofer enclosure under the rear seat. For a DSP to work as intended in this type of audio configuration you will need a DSP that can support at least 7 channels of output front-left dash, front-left door, front-right dash, front-right door, rear left door, rear right door, and subwoofer).
We Have All the Time in the World
The ability of any DSP to improve your audio system will depend on how much time and effort you are willing to spend on not just learning the software, but also researching what each setting actually will do so that you can use it properly. Complete audio system tuning does not happen instantaneously, and you will never get it “right” the first time. One can spend hours, even days sitting inside the vehicle, messing with DSP settings, listening to some music, making adjustments, and then doing it all over again. It takes a lot of patience, a lot of staring at a laptop, and a lot of listening to the same section of a song over and over and over – especially if you’re taking on the task of adjusting a DSP for the first time. So make sure that you are willing to put in the work before you commit to tuning with a standalone DSP.
In Part 9 of this series, we’ll take a look at 5 common Frontier audio upgrades owners do that are really only half done. HINT: You can’t have one without the other.
Links to All Parts of the Audio Guide
Intro: Your OEM Stereo Sucks.
Part 1: It All Starts With the Source.
Part 2: Speak(er) the Right Way.
Part 3: You Don’t Drive From the Back Seat.
Part 4: Dogs Underwater
Part 5: Less is More
Part 6: More is Less?
Part 7: Separation Anxiety
Part 8:Time Travel… While Standing Still (this post)
Part 9:Partial Means… You’re Not Done
Part 10 Finale: At the End… Here’s 10 (Things to Know)