The Grid: Bulletpoint RubiGrid vs. Z1 Off-Road Dash Platform

Rewind a bit: After over-engineering (overthinking?) a previous project (that I ended up removing a few months later), recently I got interested again in some sort of electronics dash mounting solution – this time anchored in the center-top dash area of my truck. After some browsing and some well-timed email newsletters in my inbox, I ended up buying two of the currently available flush-mount options for the 2nd Gen Frontier: The Bulletpoint Mounting Solutions RubiGrid and the Z1-Off-Road Dash Platform. (Technically there is a third option from ICS-Fab, but it is a raised, universal-type platform that looks generic and does not sit flush with the Frontier dash top.)

Since I had both in hand, I thought I’d do a comparison of the two options – not only to decide which one I liked better, but so that others can decide for themselves which one might fit their needs as well. So let’s get to it: staying true to the head-to-head format, I will be comparing each dash panel to each other in multiple categories, then determining an overall winner.
Alrightythen, let’s start with some product information and initial thoughts:
I. Initial Value
Bulletpoint Mounting Solutions RubiGrid
Since I ordered this one first (and then let it sit in the box for about 2 months because I forgot about it), we’ll start here. The Bulletpoint Mounting Solutions RubiGrid is available in 9 different configurations; I went with the basic lowest cost configuration ($39.99) since I had a collection of adjustable AMPS arms and sockets and so forth from the previous dash accessory mount project.

The RubiGrid arrives in some very nice packaging, and inside the box I found the following:
- Rubigrid top panel
- Lower mounting bracket
- AMPS mounting ball
- Instruction booklet
- Two bags of hardware
- Basic hex wrench
- Mini combination wrench
- Phillips screwdriver
- Panel removal tool
- Two drill bits (only 1 shown in the photo)

…Also included were these two things:
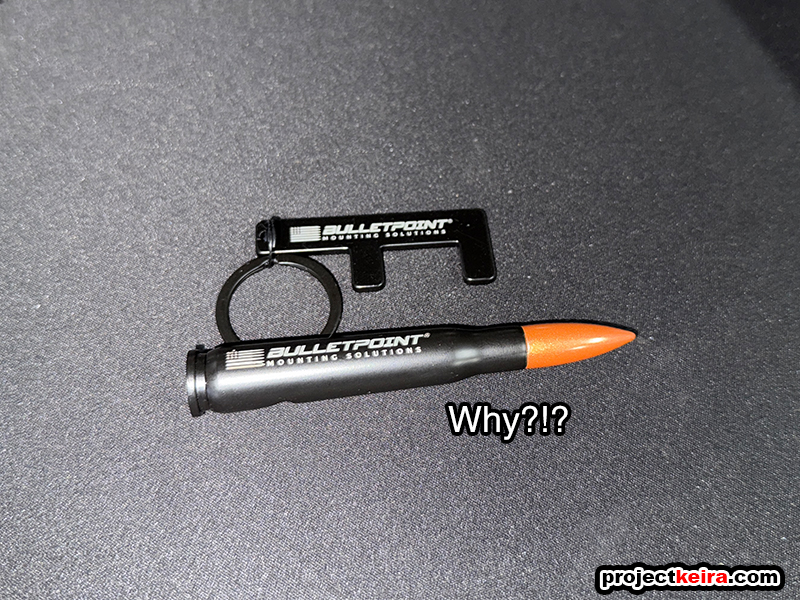
Okay, the branded keyring is a nice, standard piece of merch… but the fake bullet bottle opener? I get it – it matches the brand name (which I was slowly seeing an abundance of), but is this really necessary? Did someone at the company think this would be some cool thing, like those fake rubber ball sacks that mall crawler bros hang from the bottom of their diesel trucks?
Z1-Off-Road Dash Platform
Switching over to what I will refer to from here on out as the “Z1 Platform”, the Z1 Off-Road Dash Platform offers two versions – one for the 2005-2008 Frontier, and the one I have for the 2009-2021. You can purchase the Z1 Platform by itself, or optionally include either a non-charging magnetic mount for an additional $10, or a charging magnetic mount for an additional $25. Not bad right? However,… I almost forgot to mention a key detail here: the base Z1 Platform package has an MSRP of… $79.99! Wowzers.
Compared to the fancy packaging and presentation of the RubiGrid, the Z1 platform arrives in a bare, clinically plain white box with the Z-1 branding literally taped on (not even printed on the box!). I would have taken a photo of the unboxing but when I cut the packing tape to open it up, the whole box just fell flat. Unlike the Rubigrid packaging, the Dash Panel parts were just wrapped in white foam sheets taped closed. The contents were as follows:
- Upper Dash Platform
- Lower mounting bracket
- One bag of hardware
- Curved 90-degree accessory mount

Wait – that’s it? For $79.99? What the hell? Unfortunately, yes – for twice the price of the RubiGrid, there isn’t much to see here with the Z1 Platform. You don’t get any type of mounting ball, you don’t get any installation tools… you don’t even get printed instructions; instead, you just get a QR code linked to the Internet to an installation video where some of the steps involved some tool Mickey-Mousing (more on this later).
In terms of initial cost, the RubiGrid gives you a lot in the box (and maybe something you don’t want) for half the price of the Z1 Platform. As of this moment (early in the testing) I find it hard to explain why the Z1 Platform costs twice as much when it comes with a lot less. RubiGrid wins this round, easily. (Note: I excluded packaging, and only considered the actual contents when deciding on value)
INITIAL VALUE GOES TO: BulletPoint RubiGrid
II. Construction/Component Quality
Z1 Platform
The main upper plate of the Z1 Platform measures in at 2.84mm thick, and when weighed with the mounting bracket (plus only the hardware needed to attach the two pieces together) the Z1 Platform tips the scale at 1 pound, 0.9 ounces:


According to the product description, the Z1 Platform assembly has a “durable UV-resistant powder coat” and the included 90-degree arm is stainless steel. All three parts are very stiff, and the edges are all finished nicely. The powder coat finish is fine, but it could have been better. The installation hardware is stainless steel (good), and I like how Z1 chose larger M6 bolts to mount the platform to the dash bin. The upper platform has a small, discrete screen printed Z1 logo. I prefer small, discrete logos – with the option of larger logos (i.e. decals). some people need to put their branded gear on blast, but usually I don’t.
Bulletpoint RubiGrid
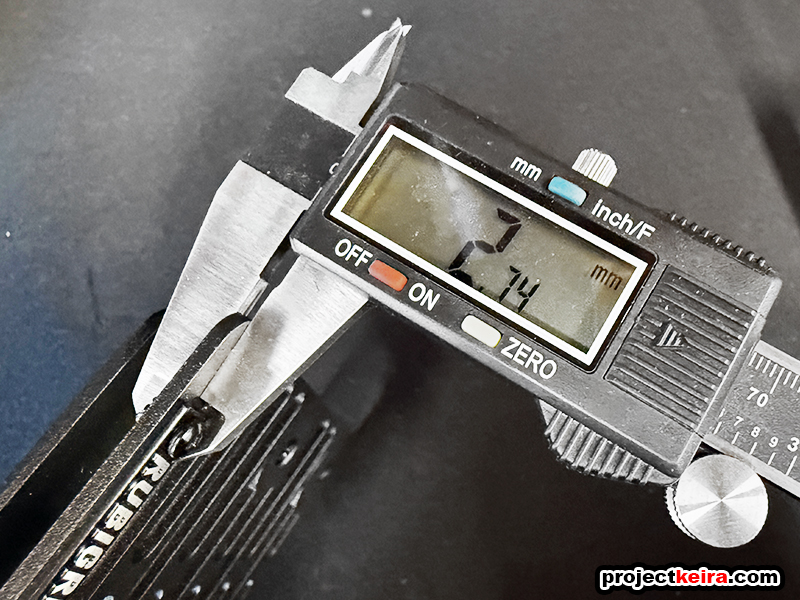
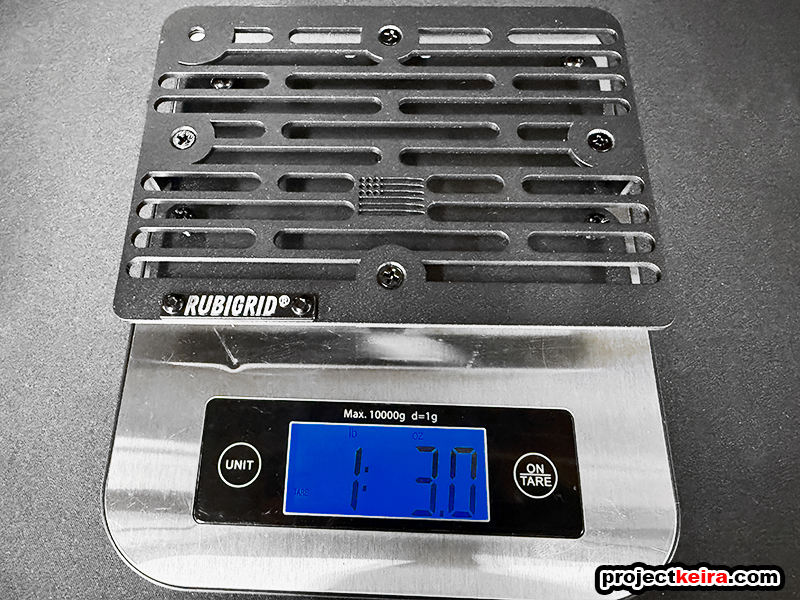
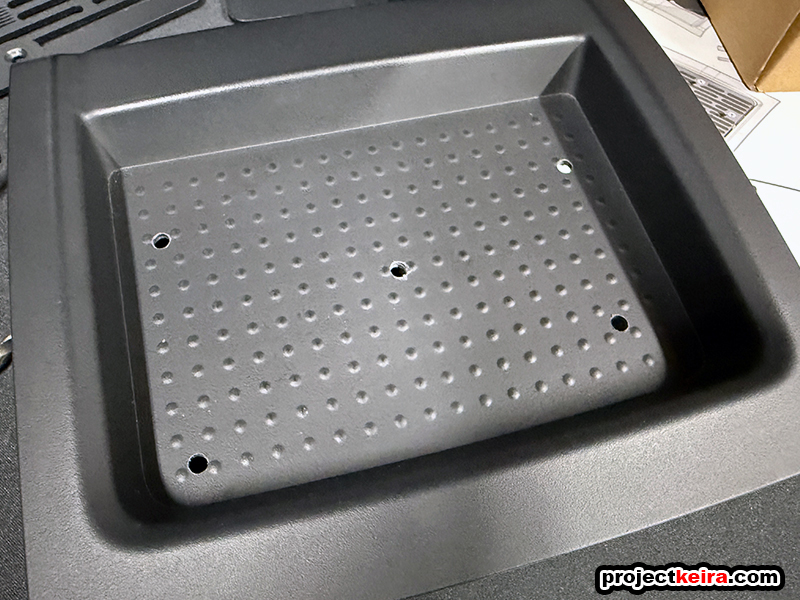
Switching over to the RubiGrid, I measured the main upper plate of the RubiGrid at 2.74mm, and when weighed with the mounting bracket (plus only the hardware needed to attach the two pieces together) the RubiGrid is slightly heavier at 1 pound, 3 ounces. Note that although the upper plate is lighter than the Z1 platform, the bulk of the RubiGrid’s weight is from the solid metal mounting bracket:
The Rubigrid and bracket have a nice, textured finish that looks and feels durable – it has a very similar feel to factory spray-in bedliner. The upper plate has many mounting slots, making it slightly flexible until it’s bolted to the mounting bracket. Four Philips screws hold the two pieces together.
In terms of construction and quality, the Z1 Platform is to offer increased stiffness in specific areas, though its finish is merely average. The RubiGrid, on the other, features a superior finish – but the upper plate has slightly more flexibility due to the numerous machined slots. This is a tie.
CONSTRUCTION QUALITY: Tie
III. Ease of Installation
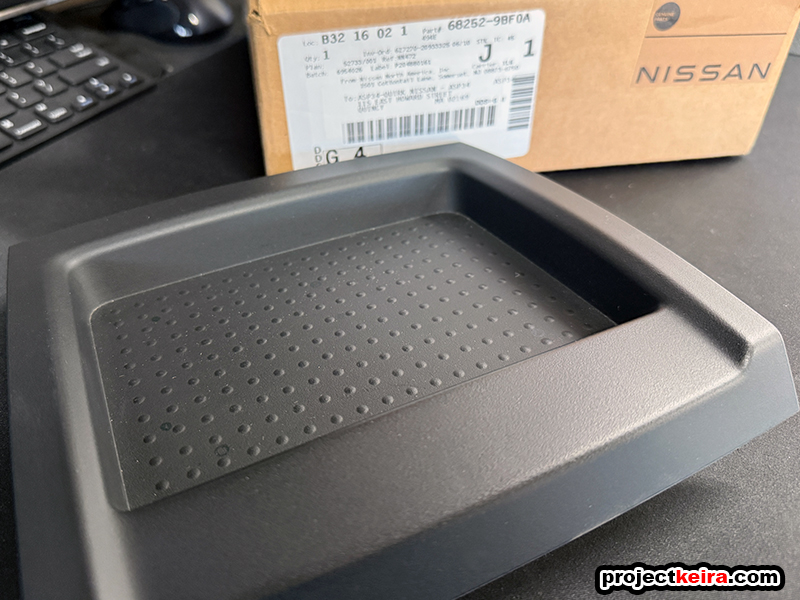
Both options require drilling into the OEM dash bin. To prepare for this comparison I purchased a couple of extra OEM Nissan # 68252-9BF0A – more commonly known as the ‘center dash top bin’ that is above the head unit:
Bulletpoint RubiGrid
The RubiGrid’s instructions were pretty straight-forward: drill five holes, attach the lower mounting plate with some bolts/screws, and it is good to go. So that’s what I did:
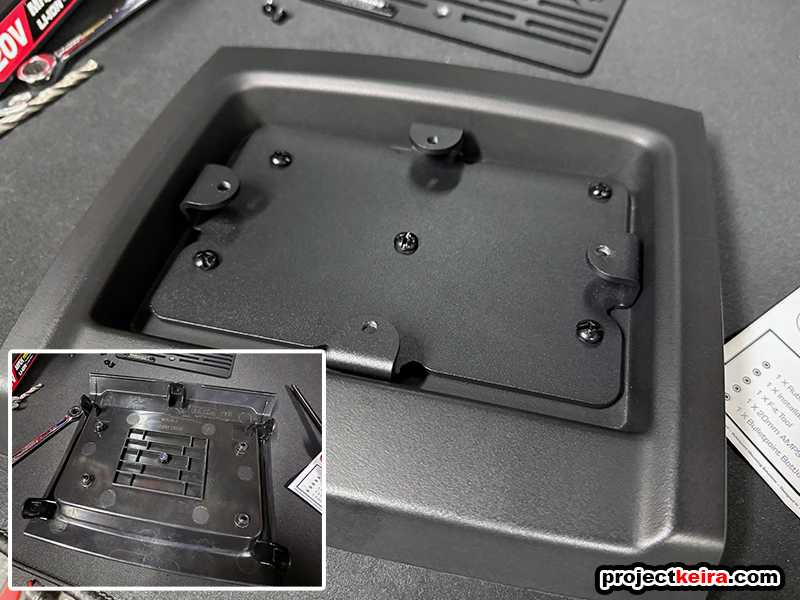
This part of the installation took less than 10 minutes – I didn’t even have to get my drill bit set, as Bulletpoint provided the correct size drill bit (nice). When attached together, the dash bin + mounting bracket is very solid. The inclusion of locknuts was another nice touch, allowing me to snug the fasteners up without needing any thread locking compound. All that was left was to snap the dash bin back into the truck, and when I did I was greeted with… an uneven rear edge. Turns out that the locknuts contacted the dashboard’s inner bracing! However this was addressed by Bulletpoint – remember how they included two drill bits in the package? The larger drill bit was specifically to be used to drill into the dash inner bracing to allow the locknuts to have clearance, as shown below:

With the two holes drilled into the dash inner brace, I attached the RubiGrid to the bracket and snapped everything into place, completing the simple, quick, and easy installation:

Z1 Platform
On the other hand… installation of the Z1 Platform really tested my patience. The beginning steps were quick and easy – per their video instructions, “simply” mark and drill three holes into the dash bin. Then trim the plastic underneath the OEM bin to allow for mounting bracket clearance. Side note for Z1: someone buy Simon a proper reamer (watch the video, you’ll see why). Better yet, a whole tool set since to “cut” the plastic bits they used linesman pliers. I however, used actual flush cut pliers because you know – I’m cutting something:

Next, install the mounting bracket in the center dash, using the existing screw to secure it in place:
So far so good, right? Well…
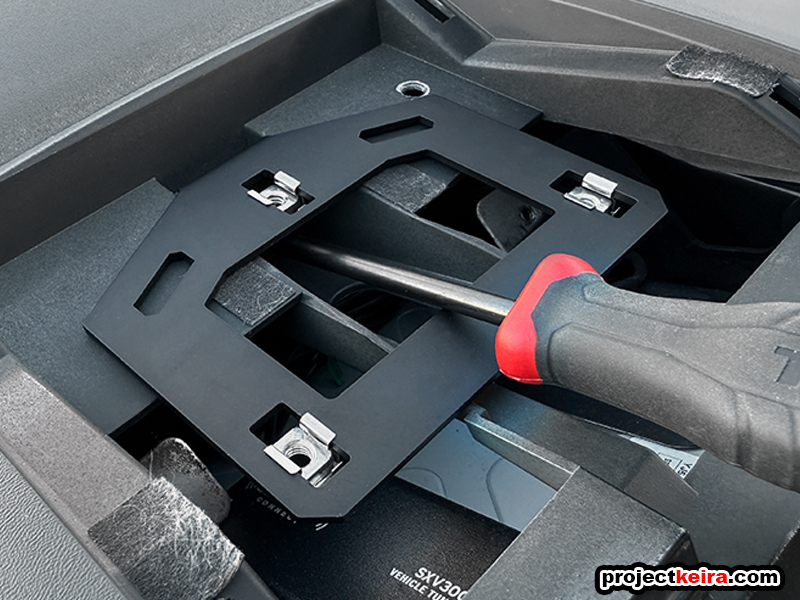
…this is the part that got a little annoying/frustrating. To attach the upper platform, you must line up the three holes in the upper panel with the three holes in the dash, down to the three clip nuts in the bracket, then thread the three stainless steel bolts to the clip nuts – with the OEM bin barely hovering above the dash. (If that sounds complicated, look at Z1’s installation video around the 4:40 mark.) They even mentioned that this part of the install would take “a little bit of patience”… but it took more than that. The few times I got the rear bolt threaded in (like they showed in the video), I would have no visibility to get the front two bolts aligned. No matter what I tried I could not get the front bolts threaded, after many, many attempts, I used my phone to take an overhead-view photo of the dash bin area, and this is what I saw:

Mind you, I did follow Z1’s own video instructions when marking the holes to drill. Turns out that the clip nuts were pushed as far forward as possible, but it was still not aligned with the holes I drilled. At this point I was annoyed that what looked like a 10-minute install was now approaching half an hour (the installation video had a lot of jump cuts during this portion… hrm?) so since this was a test bin anyways, I resolved the problem by slotting the mounting holes with my trusty Dremel:

That did the trick. I finally got the Z1 Platform bolted into the dash:

So both installations had some things to take care of, though the Z1 Platform took that to another level. Needless to say, the ease of installation goes to the RubiGrid. Luckily for the Z1 Platform, there are no negative points allowed in the scoring.
EASE OF INSTALLATION GOES TO: RubiGrid
IV. Dash Fitment
Z1 Platform
With the installation procedures completed, how do they actually look? If this was the only thing to compare, the Z1 Platform would win simply because of the small details – for example, the top platform has a larger radius curve at the rear to match the contours of the OEM dash bin perfectly. Also, Z1 chose to position the top surface of the Z1 Platform just below the inside curvature of the bin. This slight recess looks very clean, and could pass for OEM if it didn’t have the Z1 logo on top:

I really like how the Z1 sits in the center dash. Looks great!
Bulletpoint RubiGrid
Switching over to the RubiGrid, it also had the correct radius on the corners, but the RubiGrid panel itself sits too high for my taste:

Because of this position, you can see how the flat RubiGrid panel does not match the curvature of the OEM dash bin. It is pronounced enough that it is obvious that this part is aftermarket. There is also that rather noticeable “RubiGrid” emblem that is riveted to the leading edge of the upper plate. Initially I didn’t have an issue with the emblem, but during testing I discovered something about this emblem that sucked:

The photo above does not show just how bright the glare really was, as I took the photo at a slightly different angle after pulling off the road to document this. Man, it was blindingly bright! That emblem is soft-riveted in place, so if I want to remove it, 1. It will be permanent removal, and 2. There will be two visible mounting holes just there on the panel.
Anyhow, if the RubiGrid platform was positioned lower by just 6-7mm, it could have looked really nice and almost OEM stealth. However it sits up high as shown, and the cosmetic emblem may require sunglasses in the summer. In terms of dash fitment the Z1 Platform definitely takes win here. (I did not factor in the emblem glare when judging, it was just an observation that I felt I should mention)
THE BETTER DASH FITMENT GOES TO: Z1 Platform
V. Versatility
Looks are just one aspect, now let’s get down to actual functionality. Both panels are designed to allow you to install various types of mounts to hold your gear, and both panels take two different approaches to the options available. These grids were designed for versatility, and during testing I went a little overboard trying (and buying more!) a bunch of different fixtures and mounts:

Bulletpoint RubiGrid
The RubiGrid’s upper plate is specifically designed to be compatible with AMPS mounting fixtures. The Attachment Mounting Pattern Standard (AMPS) is an industry-standard mounting pattern adopted by numerous aftermarket brands, including RAM, Garmin, Arkon, and Bulletpoint (ofbviously). By basing the RubiGrid on this prevalent bolt pattern, users have access to a wide range of mounts and fixtures that are already available and AMPS compatible. Consequently, the RubiGrid features multiple horizontal rows of cutouts, providing versatile mounting options from the rear to the front.
The RubiGrid does not have pre-made mounting fixtures; anything you want to mount will require a nut and a bolt. To get you started, the RubiGrid does include an AMPS 20mm ball mount and bolt/locknut hardware in the box (I did purchase a few more Bulletpoint fixtures to match). To install any ball mount to the RubiGrid, you first have to remove the top panel from the mounting bracket by way of four countersunk Philips screws (I really wish these were hex, not Philips). After your mounts are bolted in, you can then reattach the upper plate to the mounting bracket in the dash. That means if you positioned a ball mount in the wrong spot, guess what? You have to remove the entire upper plate again to access the locknuts underneath to make adjustments.
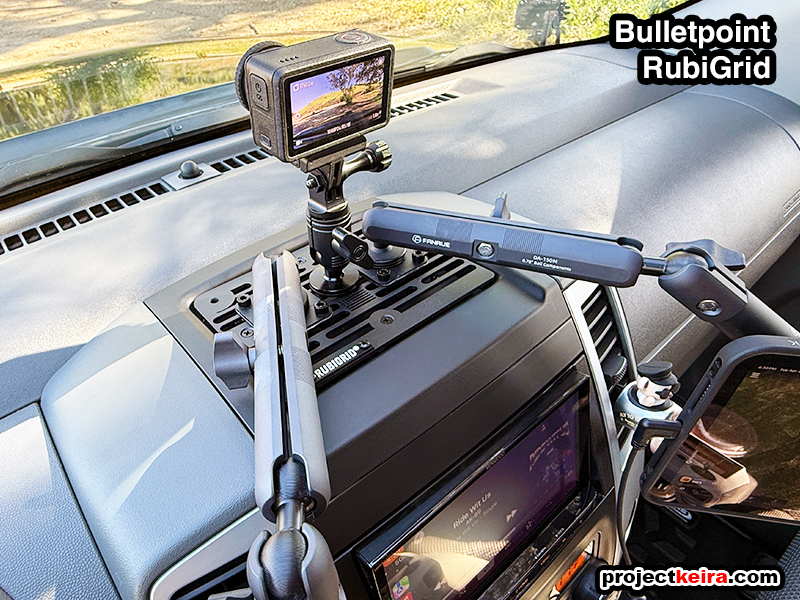
After deciding on a layout, I installed three Bulletpoint 20mm ball mounts parallel to each other along the center of the RubiGrid’s mounting plate. On the left side I used two Fanaue 150mm arms and a Bulletpoint CB mount at the end to hold the mic of my Midland MXT275 GMRS radio. On the right side I used an identical Fanaue setup, but with a QuadLock mount at the end for attaching my Apple iPad Mini 6 (the previous iPad Pro was nice, but heavy and too big). Finally, in the center I installed a Bulletpoint action camera mount, to which I attached a DJi OSMO Action 5 camera. The result is shown here:

Z1 Platform
The Z1 Platform‘s mounting plate features a slotted design compatible with “center-locking quarter-turn t-nuts,” also known as Magpul’s “M-Lok.” This popular system for firearms uses a threaded hex bolt and a special 1/4-turn M-Lok nut. To use this hardware, you simply thread the M-Lok nut onto the bolt, insert it through the mounting slot, and lock it in place with a 1/4 turn. Tightening the bolt secures the nut behind the slot – meaning you do not need access to the backside of the mounting surface.
And what if you heed to make adjustments? Removing the M-Lok is just as easy with a 1/4 turn in the opposite direction. Excellent move by Z1, as this means you can install the Z1 Platform onto the dash, and then add/adjust/remove devices whenever and as often as you want without having to remove any part of the platform from the vehicle. And that’s not all – as far as versatility goes, the Z1 Platform also has seven mounting holes with pem nuts; three of the mounting holes use M6 hardware, while the other four mounting holes use M4 hardware. Z1 includes M4 stainless steel bolts which can be used to mount the included 90-degree arm to two these holes if you chose to. Finally, the three larger openings are wide enough to pass cables through – for example, USB cables to connect to mounted devices. As they suggested in the installation video, one could run a cable through the opening and behind the dash for built-in power.
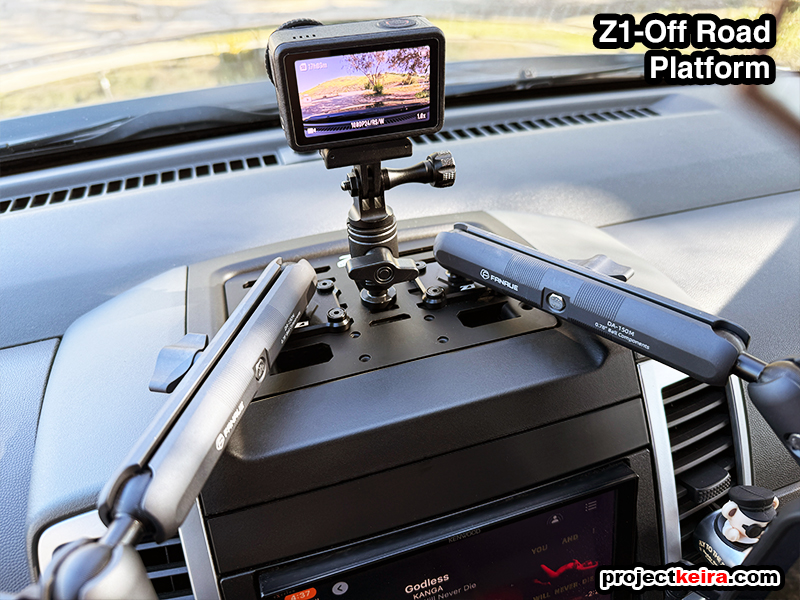
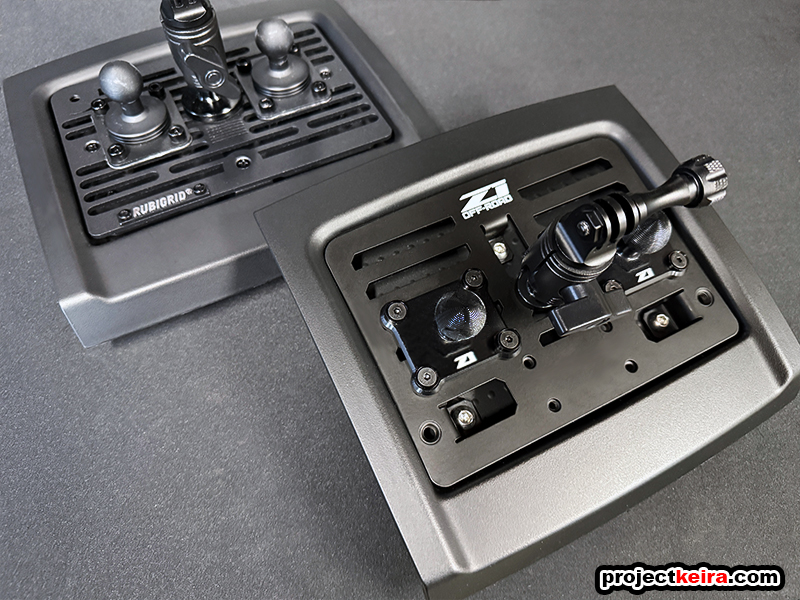
Similar to the RubiGrid, I installed two 20mm ball mounts (Z1 branded to match) on each side of the mounting plate, and I used a Tackform 20mm threaded ball with an M6 bolt at the center position. I transferred over the Fanaue setup from the RubiGrid to the Z1 Platform for an identical setup:

After installing identical accessories to both, I am giving this category to the Z1 platform. It has so may options in terms of mounting devices, and compatibility with the super easy-to-use M-Lok hardware made making adjustments a piece of cake. While the Rubigrid uses the common AMPs mounting pattern, I’m not keen to having to remove the upper plate whenever I want to make adjustments – and the Philips hardware should have been hex hardware.
VERSATILITY GOES TO: Z1 Platform
VI. On The Move Testing
The final part of the comparison consisted of what I called the “On The Move” test. In other words – I just drove around with each mounting grid, to see if anything happened while my Frontier was actually moving. To be honest I initially thought I was just going to waste time (and gas) because both systems are very similar, but I was wrong. I drove a pre-planned route that consisted of the following locations (in order): First, I drove surface streets in regular traffic, with some railroad crossings and parking lot driveways. Then I went to a nearby parking garage with speed bumps and large expansion joints. Afterward I took a 10 mile freeway drive, with my highway speed in the 60-80mph range. Finally, I went to a nearby park that had fire roads and some off shoots with washed out rough areas of terrain I could drive over.
Z1 Platform
Remember that initial difficulty during the installation of the Z1 Platform? This is where it paid off. Driving around town the Z1 Platform was solid as a rock. My Midland handset and iPad Mini did not move at all. Even with both devices’ weight hanging over the side of the dash panel (including the weght of the Fanaue arms too) the Z1 Platform kept them in place. Speed bumps and freeway driving had zero effect.
When I hit the dirt I was expecting a little “jiggle” but nope – The Z1 Platform was silent and sturdy, and even as I drove across some rougher terrain, everything stayed as-is, exactly how I positioned them. There were no creaking sounds or anything abnormal. Very good.
Bulletpoint RubiGrid
Before this part of the test I guessed that the RubiGrid would be more solid thanks to the large and heavy mounting bracket. However, just as I started the drive test with the RubiGrid, I already noticed something not good – I heard minor creaking whenever I hit a bump in the road. When I went to the parking garage, two things would happen whenever I rolled over a speed bump: I would hear a slight creak, and (more importantly) my iPad would bob downward about an inch, before bouncing back up to its original position. The GMRS handset bobbed a little too – I didn’t visually see the handset move, but the cable showed some recoil.
With all of this happening on pavement, I expected it to do worse on the rough stuff – and sure enough, it did. Just on the fire road, the dash was already creaking non-stop like the Haunted House in Disneyland. I made my way to the same rough offshoot as before, and oh boy – some of the creaking noises were so bad that I thought something was going to break. On one part of the terrain I instinctively reached out and held the iPad in place becuase subconsciously I was afraid it would bob so badly that it would smack the center console!
The Z1 platform wins this challenge easily. It’s rock-solid and seemingly built sturdy in the right places. The fact that it is actually attached to the dash support is its ace, as on the other hand unfortunately the Rubigrid – even with its heavy bracket – didn’t do as well. I was expecting a few creaks here and there when I got to the rough roads, but hearing random creaking noises while just driving down the road was not a good thing at all.
ON-THE-MOVE GOES TO: Z1 Platform
Conclusion
And The Winner Is…
Let’s check what the final scoring chart looks like:
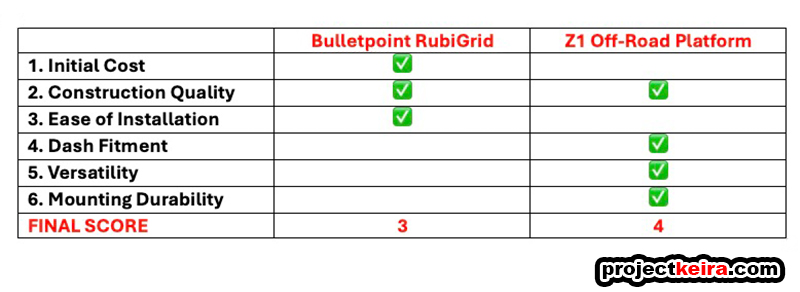
Well give me some bubblegum and call me Britney Spears – I did not anticipate this conclusion! To be honest, after the headache of installing the Z1 Platform, I thought the RubiGrid was the sure winner. However everything after the install favored the Z1 Platform, and I think when it came down to it the real world experience was more important. Not only did I find the Z1 Platform‘s compatibility with M-Lok hardware to be much easier to work with, but for sure the biggest reason why it won had to be during the On-The-Move test. A single screw was the key between the sturdiness and quietness of the Z1 Platform to the creaky and noisy RubiGrid – and it comes down to the fact that while the RubiGrid’s mounting plate was attached only to the dash bin, the Z1 Platform‘s mounting plate was attached directly to the actual dash support underneath. This gave it strength and rigidity, effectively eliminating any possibility of the OEM dash bin flexing (like it did with the RubiGrid).
Yes – the Z1 Platform still costs twice the price of the RubiGrid. And I will not forget the difficulty installing the Z1 Platform compared to the RubiGrid. However I’ve paid more for other things when I couldn’t exactly rationalize why (please don’t ask me about what I spent for my latest mountain bike), and you only have to install the mounting grid once. I also like how the Z1 Platform sits further into the dash bin when compared to the Rubigrid; at certain angles the RubiGrid looks like it’s the wrong part:

That might be just me being me, but I noticed it – so I had to comment about it.
On the other hand, the RubiGrid isn’t a bad product either. The price is good, the amount of AMPs-compatible options are more than you’ll ever need, and installation is definitely something anyone can do in a few minutes. If you’re just going to mount smaller items like phone holders positioned more on top of the grid (as opposed to hanging down), you might not have the same noise I experienced during testing.
If you’re just mall crawling or looking for a mounting solution for a primarily road-driven vehicle, don’t overlook the RubiGrid. There are a lot of satisfied RubiGrid users out there (and in this forum too) so that tells you it’s a good product. However for my purpose and my intended usage, I do need the more rigid capability that the Z1 Off-Road Dash Platform offers and I like how it stays quiet – and that is why for me, I will keep the Z1 Off-Road Platform.

Bonus: I was also experimenting with a mount for the DJi-RC controller for my DJi Mini 3 Pro, but that’s for another time:
