Uplifting: Frontier Seat Cushion Lift Mod
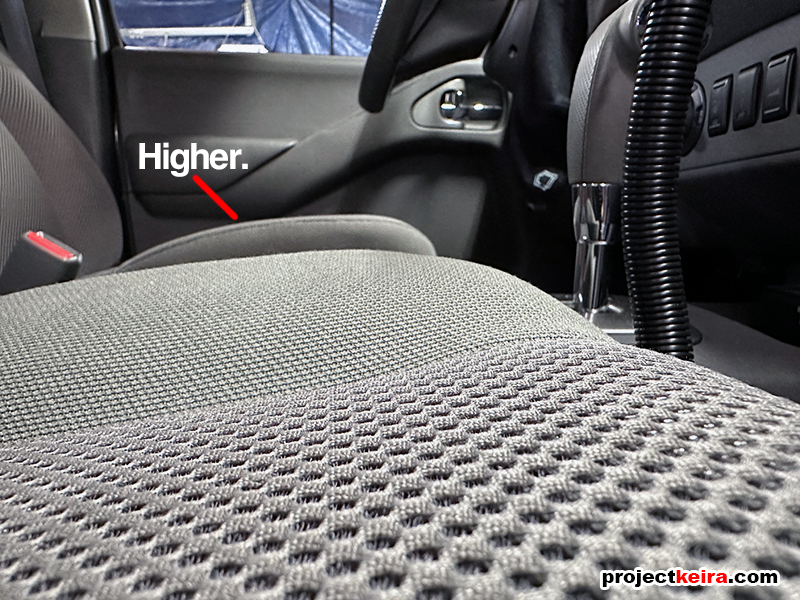
Up until recently, I wasn’t bothered by the height of the front seat cushion on my Frontier. But one day while browsing the Internet I saw this mod done by others and I decided to try it out myself. I wasn’t so sure it would make a difference, but in the end, I realized how uncomfortable the original position was. Here’s how you can do it to your truck as well.
IMPORTANT INFORMATION: Before you decide to try this mod, be aware of what you are working with. The OEM Nissan Frontier seat cushion frame is made of thin-gauge metal and formed to shape. The four “brackets” that support the seat cushion frame are thick, strong steel that is formed into a matching shape to mate with the bottom of the seat cushion frame. This gives them a lot of surface area to support the weight of the seat cushion frame (and the person sitting on the seat).
When you do this spacer mod, you are reducing the surface area to just the part of the spacer that touches the seat cushion frame. This may cause the area of the seat cushion frame to bend upward, possibly damaging the seat cushion frame. I had this mod installed for 2 weeks before noticing slight bending at the front-left bolt, so I revised the mod to include oversized washers to help spread the load to a slightly larger surface area. I used oversized washers on all four bolts, and so far it seems that adding the washers added more weight support. That said, be aware of this and do this mod at your own risk.
PARTS/TOOLS USED
Installation is relatively easy – but execution will require a little bit of patience. Note that I decided to do the mod without unbolting the seat from the cab floor; I suspect that this mod would be easier to accomplish by doing that, but I wanted to see if it could be done with the seat frame bolted in place (and it can). The mod requires the following items per seat:
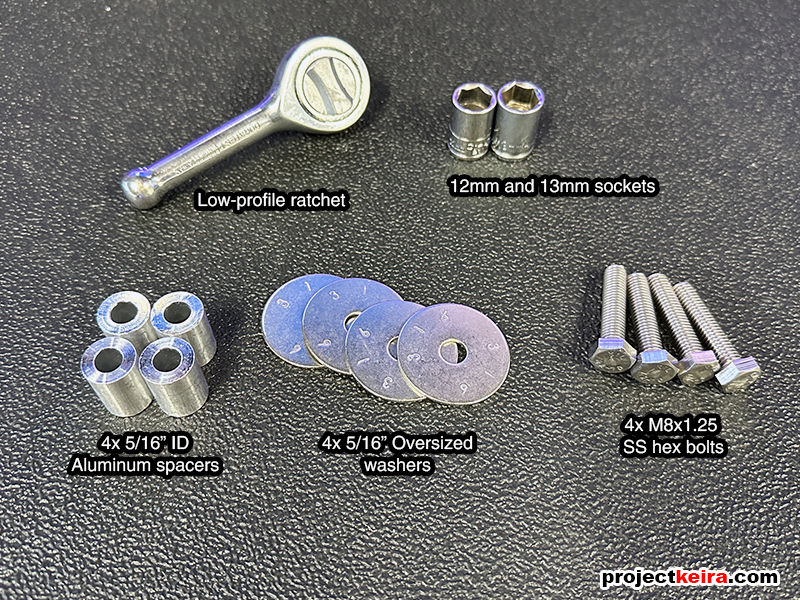
- Low-profile ratchet handle
- 12mm socket
- 13mm socket
- 4x Aluminum spacers with an inner diameter of 5/16″ (or 8mm)
- 4x 5/16″ oversized washers
- 4x M8x1.25 stainless steel hex bolts
“But wait!” you say – “what about the length of the bolts and spacers?” No worries, we’ll get to that later. For now, just take a look at what type of work is involved in doing the mod, then you can decide afterward how much cushion lift you want to do on your truck.
STEP 1: The first thing you want to do is locate the 4 bolts that you will be working with underneath the front seat cushion. For reference, I am modding the front-left seat in my photos, so if you take a look underneath you should see similar. The first two bolts are along the inner side of the cushion next to the center console, shown below (looking from the left-side front footwell):
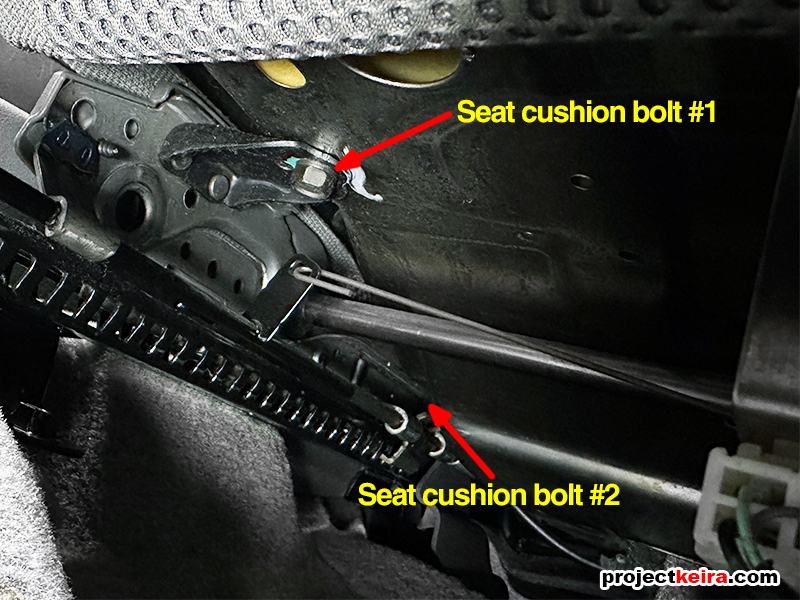
…and the other 2 bolts (along the outside of the seat cushion closest to the door) are shown below:
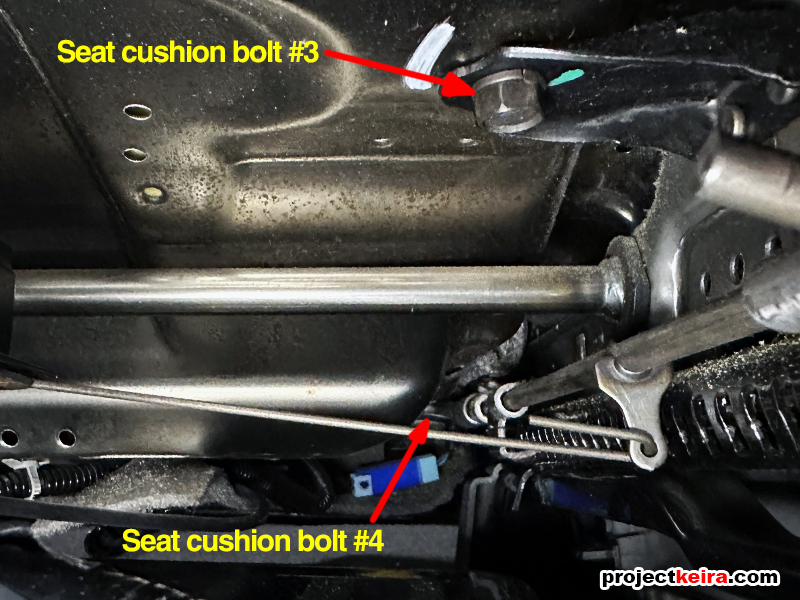
The forward cushion bolts #1 and #3 are easy to spot since they are right at the front of the seat cushions. With regards to the two rearward bolts, it will take some effort. Due to how the Frontier bucket seat cushion is designed, the #2 and #4 bolts are a little harder to see, but if you stick your hand underneath the rear of the bucket seat (from behind the seat), you will find the correct bolt (it’s the only one in that location). I found that it was much easier to locate the rear bolts from behind the seat, as opposed to trying to spot them from in front.
STEP 2: Using the 12mm socket wrench, remove all four OEM seat cushion bolts. Once the bolts are removed, you should be able to pivot the front part of the seat cushion upward, exposing the seat bracket where you just removed the seat cushion bolts:

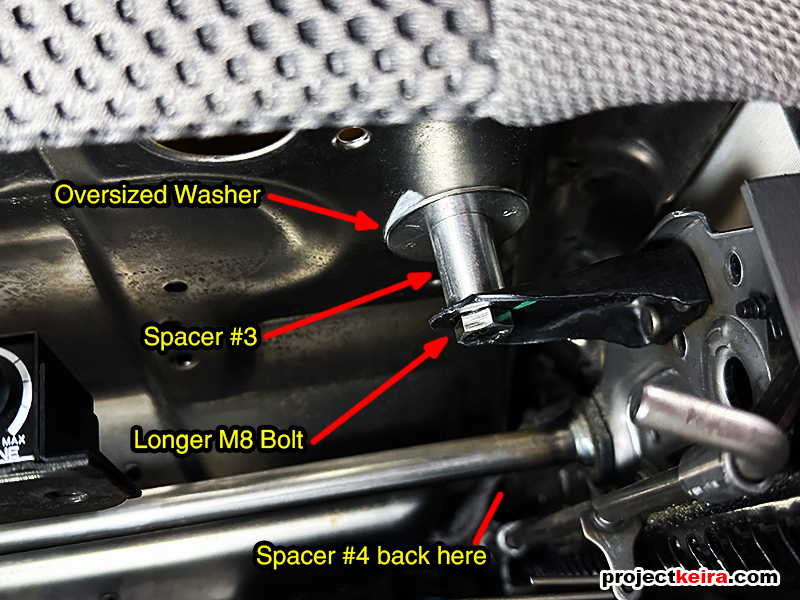
STEP 3: Get your patience ready, here’s the difficult part of the mod. From here it seems pretty simple – put four spacers on the seat cushion brackets, four washers on top of the spacers, insert longer bolts, and reattach the seat cushion. However, it will take some finesse to get the spacers and washers in place and all 4 bolts threaded correctly at the same time. Because the rearward inner bolt (bolt #2 in my photos) is the hardest to access, I recommend starting with this location first. Put the spacer on the bracket, washer on the spacer, lower the seat cushion down, then carefully insert your new, longer bolt from underneath. Try to get the bolt to thread at least 3 turns, then leave it as is. By not tightening this bolt all the way you can next move on the other rearward outer bolt #4. Carefully place the spacer and washer on the bracket and do the same (at least 3 turns threaded). With bolts #3 and #4 attached (but not yet tightened) the hard part is done! Now move forward and do the same to bolts #1 and #3. Once you get all four positions threaded, you should see this:
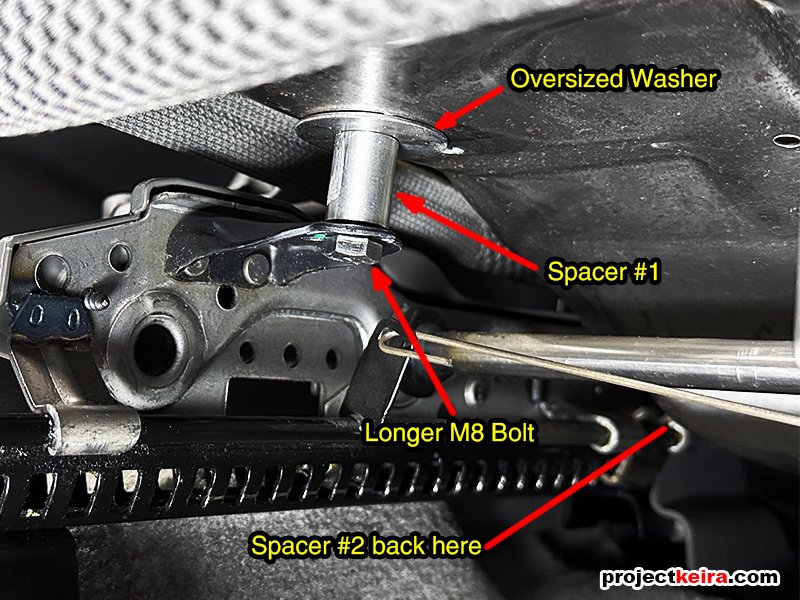
…and this:
STEP 4: From here, the only thing left to do is tighten up all 4 bolts. Switch to the 13mm socket and tighten all 4 bolts. There is no actual torque spec for the OEM seat cushion bolts, and they don’t need to be cranked down so just be sure to snug them up. That’s it! For about half an hour in labor (the second seat goes a lot faster once you’ve done it once) and $20 in parts (enough to cover both front seats) you can easily do this mod to your truck as well.
RESULTS AND OBSERVATIONS
I’ve actually had the mod in place for a couple of weeks now, and I have driven enough miles with it to know the things I like and don’t like about the mod. Let’s go back to bullet point style to cover my observations.
PROS
- More leg support – In terms of comfort, the first thing I noticed was that now the entire length of the seat cushion was making contact with my thighs. It felt more like sitting in a proper chair as opposed to a car (truck) seat.
- More relaxed knee angle – with the overall seating position higher, that resulted in my knees being bent at a much lesser angle and thus adding to comfort.
- Less weight on my butt – because more of my legs had support, that meant there was less weight pushing down on the butt area.
- Better visibility – the higher your eye level is, the more you should be able to see the environment.
- More rear seat clearance – rear seat passengers will appreciate the slight addition of more footwell room.
- Budget-friendly – a mere $20 in parts to get a more comfortable OEM seat is a lot better than spending hundreds of dollars on an aftermarket seat (plus an adapter bracket!).
CONS
- Needs patience – the mod is a little more difficult to complete if you do not unbolt the seat rails from the cabin floor.
- The first spacer might not be the right one for you – finding the perfect height to match your body type will require purchasing different spacers (though I suppose you could stack a bunch of washers instead to get that incremental adjustment)
- Loss of head clearance – whatever added height you give to your seat cushion, subtract that from your overall headroom.
- Steering wheel clearance – your steering wheel angle will need to be adjusted to clear the now-raised knee area.
- Muscle memory will be thrown off – getting into the vehicle (especially if your truck is lifted) will require some “butt recalibration” because the seat cushion is higher from the ground than it used to be.
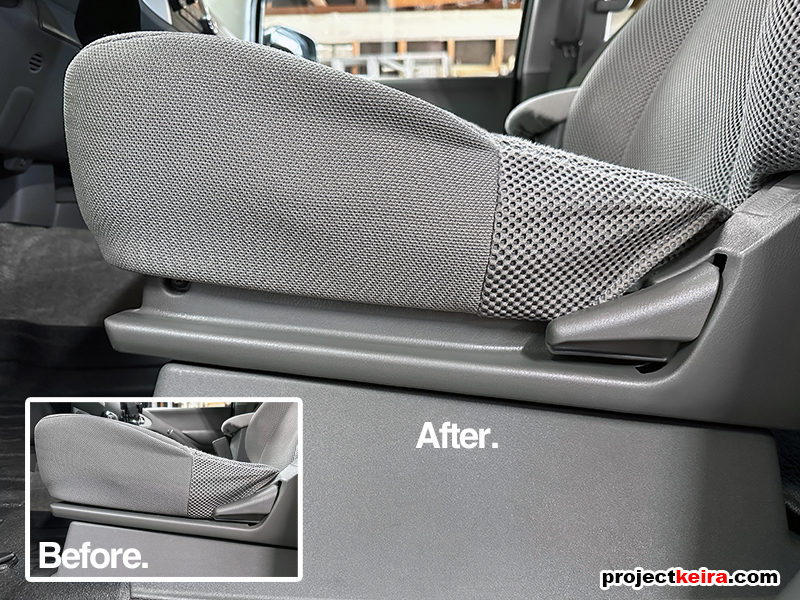
As far as what the mod looks from the outside, if you didn’t know the cushion was raised up, I don’t think you would even notice it:
WHAT SPACERS* AND BOLT LENGTHS SHOULD I BUY?
So about the spacer and bolt length required… it depends on how much you want to lift the seat cushion. While experimenting with different spacers, I found that a 1/4″ lift was not noticeable at all – you would have to go with at least 1/2″ to feel a difference. That said, I made this chart to take the guesswork out of what hardware you’ll need to do the mod. A few things of note about the chart:
- The bolt hardware must be metric M8x1.25, to match the threads of the seat cushion
- I used grade 8 stainless steel bolts for strength and their resistance to rusting
- The spacers can be standard or metric, as long as the inner diameter is at least 5/16″ or 8mm wide
- Do not do the mod without the oversized washers (a.k.a. fender washers)
- Try to choose an oversized washer with as wide of an outer diameter as possible (for more weight support)
- The bolt length suggestions below are based on having as close to the same thread engagement as the OEM bolt (without exceeding it)
![]()