Tweet, Tweeter.
So I had my custom tweeter pods roughly fiberglassed and ready for more work. After trimming the edges of the fiberglass, it was time to do a lot of sanding. I didn’t exactly lay the fiberglass super smooth, so the surface had a lot of bumps and fiberglass fiber ends I had to sand down. Knowing ahead of time that I was going to use body filler for the actual surface, I knocked down most of the imperfections using a couple of metal files and some 60-grit sanding sponges:
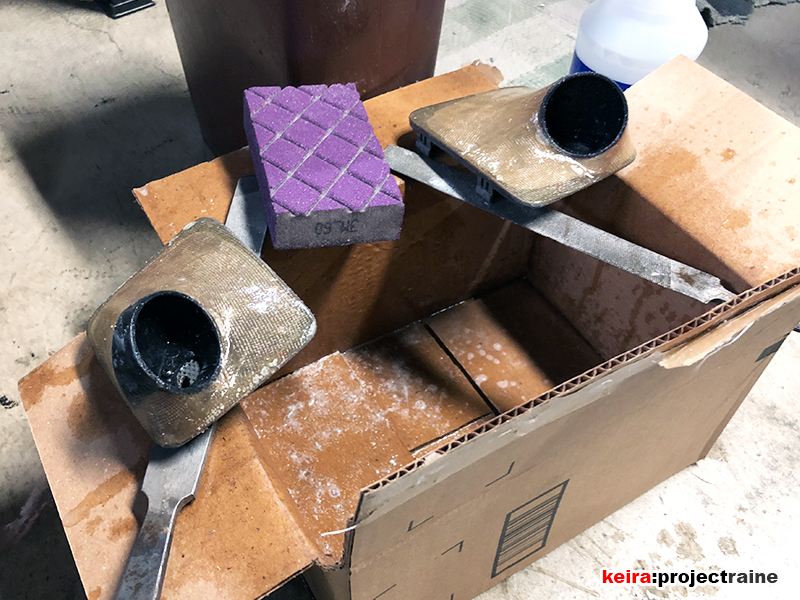

After about an hour working on both pods, they were ready for the body filler. Before that though I used some side cutters and a Dremel to cut out the bottom of the pods to remove the extra plastic from the OEM grilles:

From here it was on to the body filler. This was pretty funny actually, as I’d never worked with body filler either without supervision (and that was years ago!) so I was basically starting from scratch again, just like with the fiberglass. I’d make a batch, put some on the pods, and then the batch would solidify in about a minute! I’d adjust the ratio of filler and hardener, try another small batch, get some onto the pods, then it would soon also solidify again! Anyhow, eventually I had most of the pods covered with body filler, and although it looked like some sort of pudding (LOL) it wasn’t an issue since I already planned on sanding again to get the pods shaped exactly how I wanted them:


From here, I hand sanded the pods using 180-grit until they were shaped evenly and to my liking. I was doing this portion after work in the evening, so I’d say I spent about 1 hour hand sanding, followed by a cold water rinse to clear any dust, microfiber dry, then a light coat of SEM High Build primer. The next weeknight I’d inspect the pod, note any imperfections I wanted to fix, sand again using 180-grit, rinse, dry, and primer again.

The above process went on for about one week – mainly due to time constraints and schedule. The whole week I was taking my time and just slowly working the pods to shape.

The following week I switched to 220-grit and worked the shapes down even more (this was where I went super picky). As I was sanding I’d run my fingertips across the pods trying to use my sense of touch to determine if it there was any hard edges or any other surface imperfections. The rinse/dry/primer would show me anything I’d missed. Finally, after a couple weeks slowly working on the pods, I sprayed them with the last coat of SEM primer. I did a test fit with my Hertz HT-25 tweeters to see how they fit, especially the lower part of the pod where the pod was curved outward. The fitment was great:

Satisfied with the pod shapes, it was time to spray the actual color. A friend of mine who was good with painting helped me out and mixed up some custom SEM Color Kit paint that was as close as we could get to the OEM Nissan “steel” dash color. We sprayed 2 coats of the custom gray first:

The following day I went with some super fine 440-grit and hand sanded the pod surface, followed by 2 more coats of paint. The last 2 coats were sprayed differently; to get some sort of texture to the surface (since the dash itself wasn’t exactly smooth) I opted to spray the SEM paint from above, letting the paint “fall” down onto the pods, as opposed to spraying the pods with a direct shot of paint. I know it sounds weird that after all that sanding to get the surface smooth I went with adding a mild texture, but that’s just how I did it. Last but not least, one thin coat of SEM Low Luster Clear Color Coat and the pods were ready to install:


With the tweeters installed into their new pods, the next thing to do is tweak my system tuning to take into account the new position, angle, and distance of the front tweeters. That part is easy; the hard part of making my own custom tweeter pods is finally finished!