Audio Upgrade Guide, Part 6: More is… Less?

PART 6: More is… Less?
a.k.a. How Adding Weight (in the Form of Sound Deadening Material) Enhances the Audio Experience.
At this point, it’s safe to say that we’ve covered most of the “electronic equipment” portion of the guide in terms of why your source is important, what speaker choices do in terms of expanding the sound you hear, why speaker location matters when improving sound, how subwoofers complete the audio spectrum, and why having ample amplification is ideal. Then one day you’re out on a nice road trip drive, cruising at highway speed, when you turn on your super sweet upgraded audio system, and… it doesn’t sound as good as it did in the garage when you were setting everything up. The crispness of the highs, the small details in the music, and the bass doesn’t hit like when you first turned your new audio system on in the garage after getting everything installed. What gives? The answer: vibration.
Shake and Bake
Yes, saying a single word doesn’t tell you much, but here’s some quick and simple science for you: basically, all the sounds you hear (and many you can’t) is simply something that is vibrating and creating waves, whether it’s through a liquid, gas, or solid material. Your vocal cords vibrate when air passes them to make your voice audible; a guitar string vibrates when you pluck it to make sound notes, and a speaker vibrates the air around it to create the music you hear in your truck:

Unfortunately, the same vibrating sound waves your speakers are creating also affect any other solid material in the vicinity that is susceptible to sound waves – like metal or plastic panels… not coincidentally the exact same things that your vehicle cabin is made of. Every material will vibrate at a specific frequency or its “resonant frequency”. To keep it simple, generally larger or thicker materials will resonate (oscillate or vibrate) at low frequencies and smaller or thinner materials will resonate at higher frequencies.
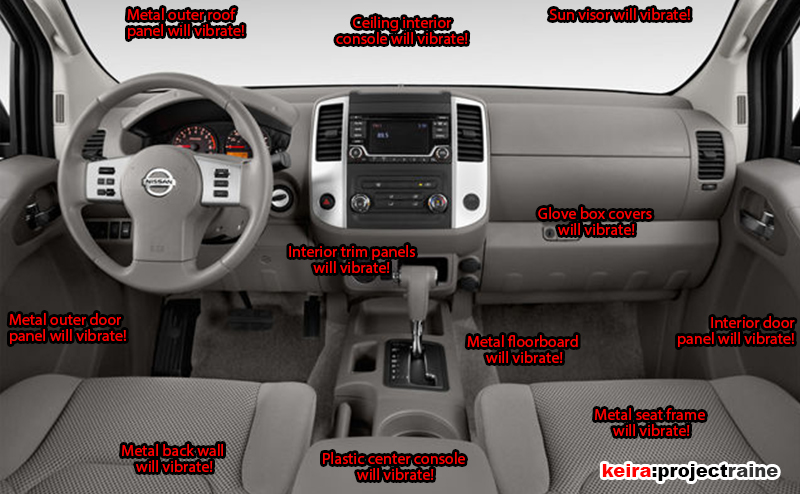
To put this into a real-world example – if your metal door panel has a resonant frequency of say 120 Hz, whenever your music plays something at 120 Hz, that metal door panel will vibrate. Now take that basic idea and extend it to your entire vehicle interior and you’ll see how this can become a problem quickly! Sheet metal door panels, sheet metal roof, sheet metal floor, plastic door skins, plastic trim, plastic interior panels, plastic glove box cover… everything in a vehicle interior is prone to vibrating at certain frequencies and at different frequencies based on the material properties:
So with all of these things capable of vibrating, how are we supposed to “fix it” so that we can enjoy our music without having to also listen to plastic and metal rattles? Simple: we change their resonant frequency.
Change the Channel
I just told you that every material will vibrate/rattle at a specific frequency. For this discussion, what that actual resonant frequency is will vary depending on way too many factors – material type (Is it metal? Plastic? Aluminum? Steel?), material composition (chemical properties), material thickness, material area, mounting method, vehicle location, proximity to speaker sound waves… and so on and so on. Sure, there are scientific ways to get the actual resonant frequency of every single rattling or vibrating component inside your interior, but only superdorks go that far. For us, all we need to be aware of are two things:
- What part of the interior is rattling/vibrating when we play music; and
- What method we’ll use to try to eliminate the rattling/unwanted vibration.
But the one thing that is the same here is that to reduce or eliminate rattles/unwanted vibrations, we will have to effectively change the resonant frequency by adding mass. This is where various forms of “sound-deadening “ materials come into play.

How “Sound Deadening” works
Mass makes a difference – and that’s basically how sound-deadening materials work. The name “sound deadening” is a little misleading, because it doesn’t really “deaden” any sound. A common misconception is that these sound-deadening materials actually absorb or cancel unwanted frequencies to eliminate rattling/unwanted vibration, but this is incorrect; sound-deadening materials function by changing the mass of an object so that its resonant frequency changes. So understand that the object may still vibrate… but with sound deadening applied, it will now vibrate at a different resonant frequency (ideally a frequency outside those being played by your music). If done correctly you can eliminate any associated rattle/unwanted vibration that was there at its original resonant frequency by applying sound-deadening materials.
The most common way to achieve this is by sticking a material to the offending panel so that the panel gains mass, and thus has its resonant frequency altered. The material commonly used in retail sound-deadening materials is some form of butyl rubber. Butyl rubber in the correct composition and thickness has good shock absorption characteristics, is resistant to moisture, and has excellent mass-to-area properties. When attached to vehicle panels, the added mass of the butyl rubber effectively changes the overall mass of the panel itself.

Advantages to Sound Deadening
If you’ve ever been in a luxury vehicle, you’ll know that they are very quiet, everything feels solid, and road noise is at a minimum. All of that is due to luxury vehicles having a lot of sound-deadening materials and techniques applied. Adding sound-deadening to your vehicle may help reduce or eliminate unwanted interior rattle and vibrations when you’re playing music, but there are also other “side bonuses” that also come with installing sound-deadening that you might not immediately realize. One bonus is that it not only keeps your interior panels from vibrating, but it also helps keep outside noise from getting into the cabin; this includes road noise, wind noise, loud vehicles on the road, tire noise on the pavement, and so on. Another bonus is that you get more interior insulation since you added more layers in between you (in the cabin) and the elements (outside weather). The sound deadening slightly helps in keeping the summer heat and the winter chill from getting into the cabin. Finally, just like more expensive luxury vehicles, when you close a door with sound deadening applied, the door will close with more of a luxury vehicle-like thud than a hollow-sounding metal shell.
Lay It Down
If you decide to add sound-deadening sheets to your vehicle, be aware that it is very labor-intensive. A lot of interior disassembly will be required since you’ll need access to the most prone places of the vehicle that can vibrate or rattle. For example, if you plan on adding material to the floor panels, you’re most likely in line to have to remove the seats completely, the center console completely, and any other thing bolts to the floor before you can remove the actual carpet liner. Then under the carpet liner, there may be electronics or wiring harnesses or air ducts that you also have to remove to gain access to the bare floor of your vehicle. Only at that point can you install your sound deadening… then go through the entire process in reverse to reinstall everything back into the cabin.
The doors are the usual places to start with sound deadening (since they are a series of panels that can easily vibrate with sound), meaning you only have to figure out how to remove the interior door panels. With the interior door panels removed, it’s just a matter of measuring and cutting sound-deadening sheets to fit the areas you choose. A general rule is 30% coverage (meaning for each panel you want at least 30% covered with sound-deadening material) but some choose complete coverage for maximum sound-deadening capability.

How much you use depends on your ability, your budget, and if you already have a rattling issue you’re trying to chase down. Each panel is different, just like each person listens to different types of music with different frequencies at different volume levels. Some people might just need a small 6×6″ piece of sound deadening behind the front door speaker location to keep the outer door panel from rattling, while others might lay down sound deadening on not just the outer metal door panel, but the inner metal door frame as well as the interior door panel to keep the whole door from rattling from heavy bass music. The target areas of the Frontier to consider adding sound deadening material to are (in order of what I think is of importance): door panels (inner and outer), roof panel, back wall panel, floor panels (near the front where the firewall is).
Know the Costs
Another thing to be aware of is that effective sound deadening costs money. For example, to completely cover the inner and outer door panels of my Crew Cab, I needed approx. 30 square feet of Dynamat Extreme, at the cost of about $4.40 per square foot, or $160.00 (2015 pricing). Bear in mind that that just took care of the four doors; I had to buy more Dynamat to cover the rear cabin wall, front driver and passenger footwells, and the underside of the roof panel. An associated “cost” is time – before you even get to install the sound-deadening, you have to disassemble or remove a lot of interior parts. One good thing though about installing sound deadening is that you can partition the job out over multiple days for each separate “area”, i.e. one day you can just work on the front doors. The next day you can do the rear doors, or just the roof panel, or just the back wall. The most labor-intensive area would be the floor; to do a complete job you’ll have to remove the two front seats, the rear seats, the entire center console, lower door trim panels, and then the molded floor carpet.
What Brands to go With
Whenever anyone asks me what sound deadening should they purchase, I always recommend brand names like Dynamat, Second Skin, or Soundskins. I don’t just recommend them just because they are brand names, but I recommend them because every time I’ve used them they have proven to be effective and worth the cost – with actual numbers to back it up. For example, using a UMIK-1 calibrated audio mic I did a before and after comparison of the sound levels inside my Frontier, and my results were as follows (before is stock, after is after installing Dynamat Extreme):
- Idle before = 49.7-db / after = 45.5-db (-4.2-db drop)
- 30mph before = 59-db / after = 55.1-db (-3.9-db drop)
- 60mph before = 72.7-db / after = 69.1-db (-3.6-db drop)
What do those numbers mean? On paper that shows a noise level drop of 3.9-dB (averaged), which is a significant change. More importantly though, to my ears (and everyone riding in my truck) that 3.9-dB decrease meant sitting inside my truck was noticeably quieter, with less road noise, no rattling panels, and better-sounding music.

Why Brand Names are Typically Better
Of course, there will without a doubt always be someone who will claim that they used some off-brand or other “alternative” material to sound deaden their vehicle that “basically does the same thing” as Dynamat, and that’s perfectly fine – everyone has an opinion. What I find telling though with this topic is that in every case of someone arguing against using a more expensive brand name sound-deadening material, 100% of the time these claims always boil down to the real reason why they used something different – and go figure, it’s always because they simply did not want to spend the money. Some will preach that the name brands are all “overpriced marketing” or that they somehow discovered some “secret material” for sale that was meant for a different application but works just as good or even better than brand name sound deadening at (here it is again) a lower price… only to later add in more info like that they had to apply multiple layers of their cheap stuff to get “similar performance” of a single layer of a brand name material (also usually claimed without actual hard numbers to back it). So when it comes down to what brand to use, ultimately it comes down to choosing not just by price but also by actual effectiveness.
Silence is Golden
So that’s it – the benefits of adding sound deadening materials in a sorta-large nutshell. If you decide to go this route, do yourself a favor and do the research. Look at each brand, what they claim, and if they have actual proof/hard data for comparison. Learn how the installation is done, and check if you need any special or helpful tools (like a mini-roller). Plan ahead, and take some measurements of your vehicle to get a good idea of how much material you’ll need; once you start installing sound deadening, it’s such a hassle to have to stop midway through because you ran out of sound deadening! Once you’re done though, you can enjoy better, cleaner-sounding audio as well as a tighter, less noisy vehicle!
In Part 7 of this series, we’ll discuss why separation is the best… and the worst. HINT: You know the saying, more parts mean more things can go wrong.
Links to All Parts of the Audio Guide
Intro: Your OEM Stereo Sucks.
Part 1: It All Starts With the Source.
Part 2: Speak(er) the Right Way.
Part 3: You Don’t Drive From the Back Seat.
Part 4: Dogs Underwater
Part 5: Less is More
Part 6: More is Less? (this post)
Part 7: Separation Anxiety
Part 8: Time Travel… While Standing Still
Part 9:Partial Means… You’re Not Done
Part 10 Finale: At the End… Here’s 10 (Things to Know)